
... humming machinery is fine, amplifiers not so much ...
update 05-Jan-2022
- updated ieLogical Assembly manual: bias resistor clarification
overview
The
M-125 is incredibly good value in today's insane HiFi Jewelry marketplace. It's
not pretty or child safe, but is sonically very, very good. The amplifiers take
everything in stride. It's FUN to listen! Now, almost
two years in, I continue to be impressed with everything about these
amplifiers. Nothing seems to phase them. They breathe LIFE into
the music.
Power - Detail - Air - EFFORTLESS! The first time I played the 1812 on Chesky
CD65, I nearly jumped behind the bookcase when the cannon fired!
Reviewed by Glenn Young and enthused users comment favorably in
the Dynaco Tube Forum,* AudioAsylum, diyAudio, etc. The amp is very versatile
with both pent/triode modes, and is sonically configurable with a variety of
tube combinations. Since my Citation II I've had a soft spot for KT‑88
amps and owned several. In pentode mode, the M-125 travels a middle ground
between the PrimaLuna Prologue 5 [PL5] and NuPrime ST-10. It's not as recessed
as the PL5 nor as forward as the ST-10. IMO, I'd adjudge the amp a perfect
match for the ≈4Ω TC-50s when paired with Kimber
BiFocal-XL in my system and ROOM!
March 2020 - Spica TC-50 retired for tri-amped Eminent Tech LFT-8b.
NuPrime ST-10 for woofers, M-125s mid and PL5 tweeter. 2 x miniDSP 2x4HD for
crossover. Kimber Monocle-XL for the mids and HannLinte
Braided OFC 10AWG for woofers and tweeters.
As always, YMMV.
Mr. Latino was very responsive to pre-purchase email questions about the
amplifiers.
This missive is intended for the competent DIY enthusiast. If you purchased
built amps, by all means have at it if you feel competent.
• ieLogical M-125 Ultralinear assy manual. Version
29-Dec-2021 to build the VTA / Tubes4Hi
M-125 as an Ultralinear only version with improved bias, 4 power tube bias
check... and other assorted improvements. Format follows original build
instructions, so you may pick and choose. Please contact ASAP with any anomalies.
• VTA M_125 Debug Workbook to
assist troubleshooting.
From
the Tubes4HiFi website [current as of 14-Nov-2021]:
M-125 SPECs
Power output (4 X KT88) 125 130 watts from 17 Hz to 32 kHz at
less than 1% THD in ultralinear - 65 70 watts in triode
¿¿¿ Somehow the amps got more powerful
with the same transformer specs ???
- Nope. 1kHz 125W distortion is 2.8%. 1kHz distortion reaches
1% @ ≈55W.
Power output (2 X KT88) 70 watts from 17 Hz to 34 kHz at less than 1% THD in
ultralinear - 40 watts in triode
- probably not a good idea to run w 2 power tubes. Could be
hard on the heaters.
IMD ........................... < .38% (19 kHz and 20 kHz) at rated power
- Nope. CCIF 19/20kHz d2L is 0.82% @ 6W, IMDpwer is 0.84% @
0.6W
Frequency response ......... 10 Hz to 35 kHz +/- .1 dB at 1 watt
- Nope. -0.19dB @ 50Hz & -0.1dB @ 11kHz relative to 1kHz
Power bandwidth ............ 17 Hz to 37 kHz +/- .3 dB at 125 watts
- Nope. -0.27dB @ 20Hz & -0.87dB @ 27kHz relative to 1kHz
Sensitivity .................... 1 volt in for 125 watts out
- Nope. ≈1.6v which is somewhat
beyond most -10db consumer gear.
Feedback ..................... 10 dB
- Nope. ≈3.9dB
Version ..................... ??? - currently v19 as of 19-Sept-2021
- Nope. PCB layout identical to v15. v16 dropped ground plane
fill. At best, these are point revisions, i.e. Circuit layout is the same. Some
amps delivered with v16 component values and v19 boards. Mid 2021 schematic has
a minor change in component values.
Mid 2021 v19 schematic changes relative to early 2019 v16:
· • bandwidth reduced from 96kHz to 31kHz !?!?!? c12 changed to 680pF
· • a bit more feedback - r8 reduced to 6.8k
· • a bit less gain in the phase splitter - r20/22 changed to 27k
· • a bit lower HP filter to phase splitter - c6/8 changed to 0.33µF
· • it should be note the above two changes alter circuit voltages, but since these are not accurate, par for the course
· • OP transformer? Above changes could be to compensate for a new transformer, but if so, one should expect sonic deltas. Deltas are not a negative per se, as long as they complement the rest of the system. No component operates in isolation!
In
short, who knows how the new amplifier performs or sounds. M-125 gain was
already low for unbalanced -10dBV consumer levels. On line specs not updated as
of Sept 19, 2021. !! CAVEAT EMPTOR !!
Claims for power consumption, SNR, distortion and feedback are grossly
inaccurate and likely never verified. Almost certainly not verified for each of
the plethora of arbitrary modifications over the years.
We did. Driver board revision v16. See the Pudding @
lab on the cheap. Load: 8Ω ‖ 16nH
Amps drive Kimber Monocle XL 2.5m & LFT8b mid panel: 10.7Ω ‖ 37nH...
... which
just goes to prove specs are often not worth the paper to print
THE AMPS SOUND BLOODY AMAZING !!!
From
the Tubes4HiFi website [current as of 29-Dec-2021]:
M-125 FAQs
1. Are there any advantages to the 16 gauge stainless chassis?
• Besides the obvious fact that this chassis will never rust, a stainless
chassis is non-magnetic and cannot hold a magnetic field.
- Nope. Not all stainless types are non-magnetic. A magnetic
field is static and only has effect when interrupted by a conductor. Magnetic
permeability determines shielding at low frequencies and stainless is not
particularly effective.
• Amps built on stainless steel chassis tend to be quieter than amps built on
standard steel chassis.
- Nope. Quieter how and by what properties?
• The 16 gauge chassis weighs about 1.25 pounds more than if it was made of 18
gauge steel.
- So??? It could be made of 12ga black anodized aluminum and likely
run cooler. Not that heat is much of an issue with all the hot bits hanging in
the breeze.
• The 1.25 pound extra mass better supports the heavy transformers and also
acts as a somewhat larger heat sink to help the two transformers run a little
cooler.
- Nope. Most of the chassis mass is far from the transformers.
Stainless is a poor thermal conductor and the shiny surface is a poorer
radiator relative to black anodized aluminum. The output transformer has very
little thermal coupling to the chassis. The power transformer has next
to none on the vibration isolation washers!
2. How does the VTA M-125 compare in sound quality to your other two
kits - the ST-70 and ST-120?
• The M-125 uses the same basic circuit as the ST-70 and ST-120 and sounds very
similar to my other amp kits at lower volume levels.
- ??? In what context ??? Components can vary dramatically when
placed in divers systems. Pure speculation?
3. What is this 4 output tube or 2 output tube option?
• The circuit is arranged so that the amp may be operated with either two left
side and two right side output tubes OR just one left side and one right side
output tube.
- Nope. A really dumb idea. Mixed up matched sets, repeated
tube insertions, repeated bias pot adjustments and running tubes at
higher heater voltages will shorten all their lives.
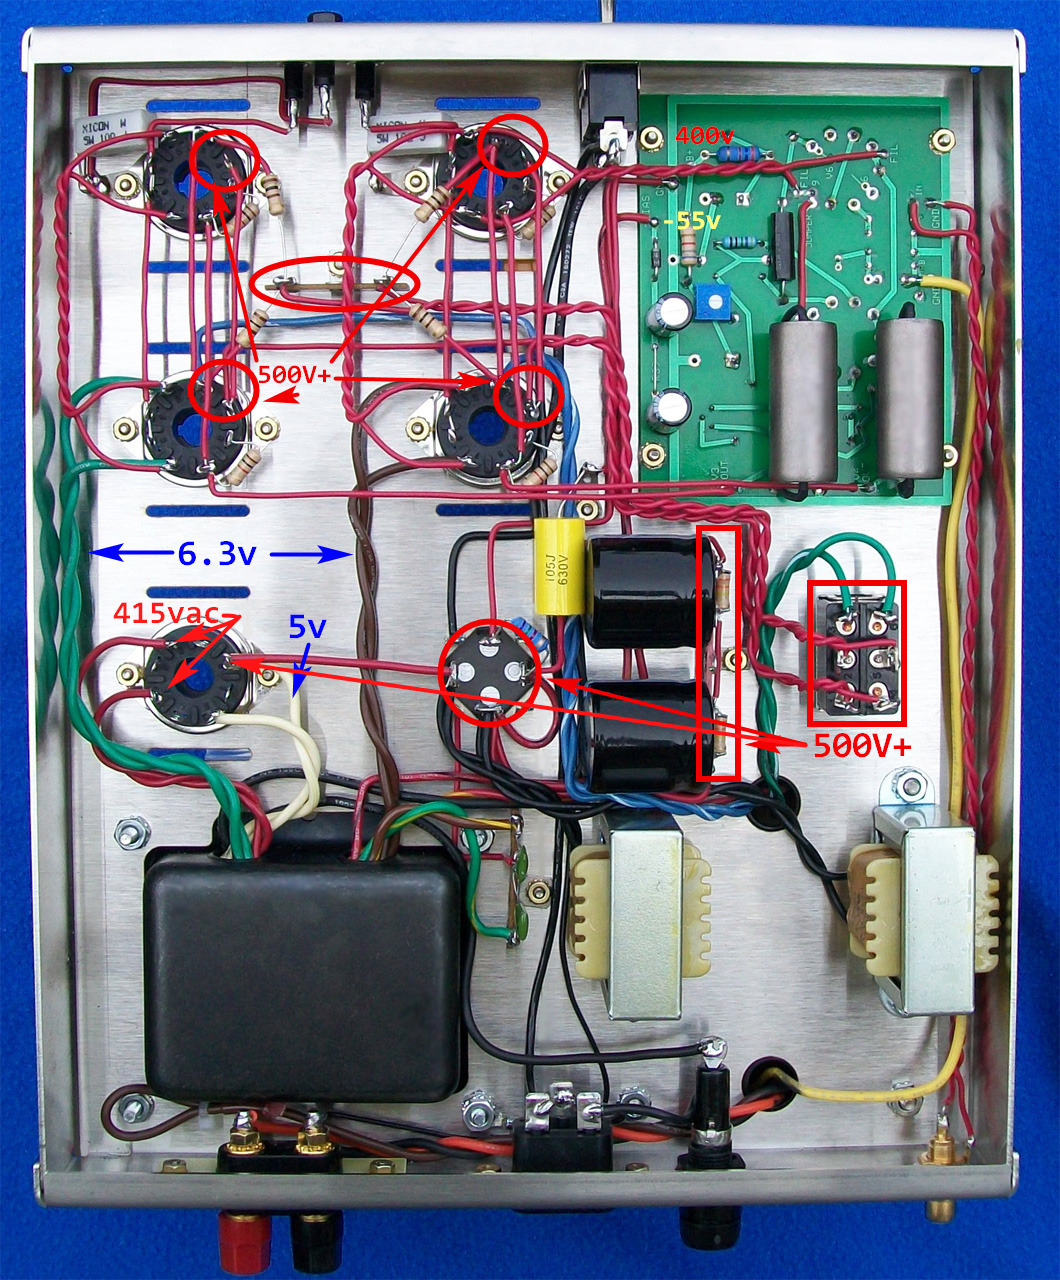
WARNING:
Lethal Voltages!!
- Proceed ENTIRELY AT YOUR OWN RISK -
NOTE:
This document refers to the Audio reference as 0vA.
Earth Safety on an AC receptacle is connected to 'ground' in the AC panel.
Direct Connection of 0vA to Earth Safety may give rise to so called 'ground
loops'.
We recommend isolating 0vA and Earth Safety with a Loop Break, detailed below.
Click
thumbnails for a larger image.
ESC or Click Upper Right 'X' to close.
Arrival

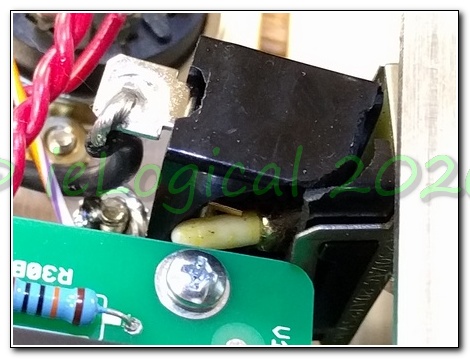
Two heavy boxes arrived, one with an ominous pimple. The assembled amps were shipped in the kit box, too small for such heavy objects, permitting only woefully inadequate packing. Upon removal, the left amp rattled. The power switch toggle had been forced into the switch, destroying it. The impact force was enough to cross-thread and deform the mounting nuts, making removal particularly difficult.
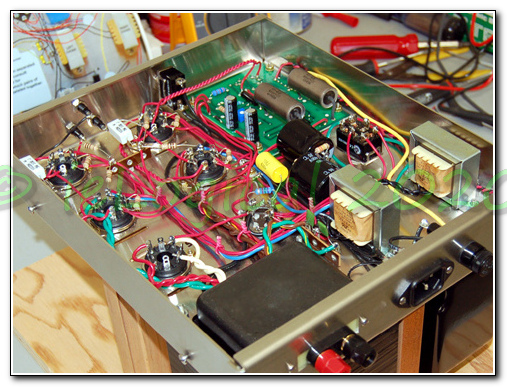
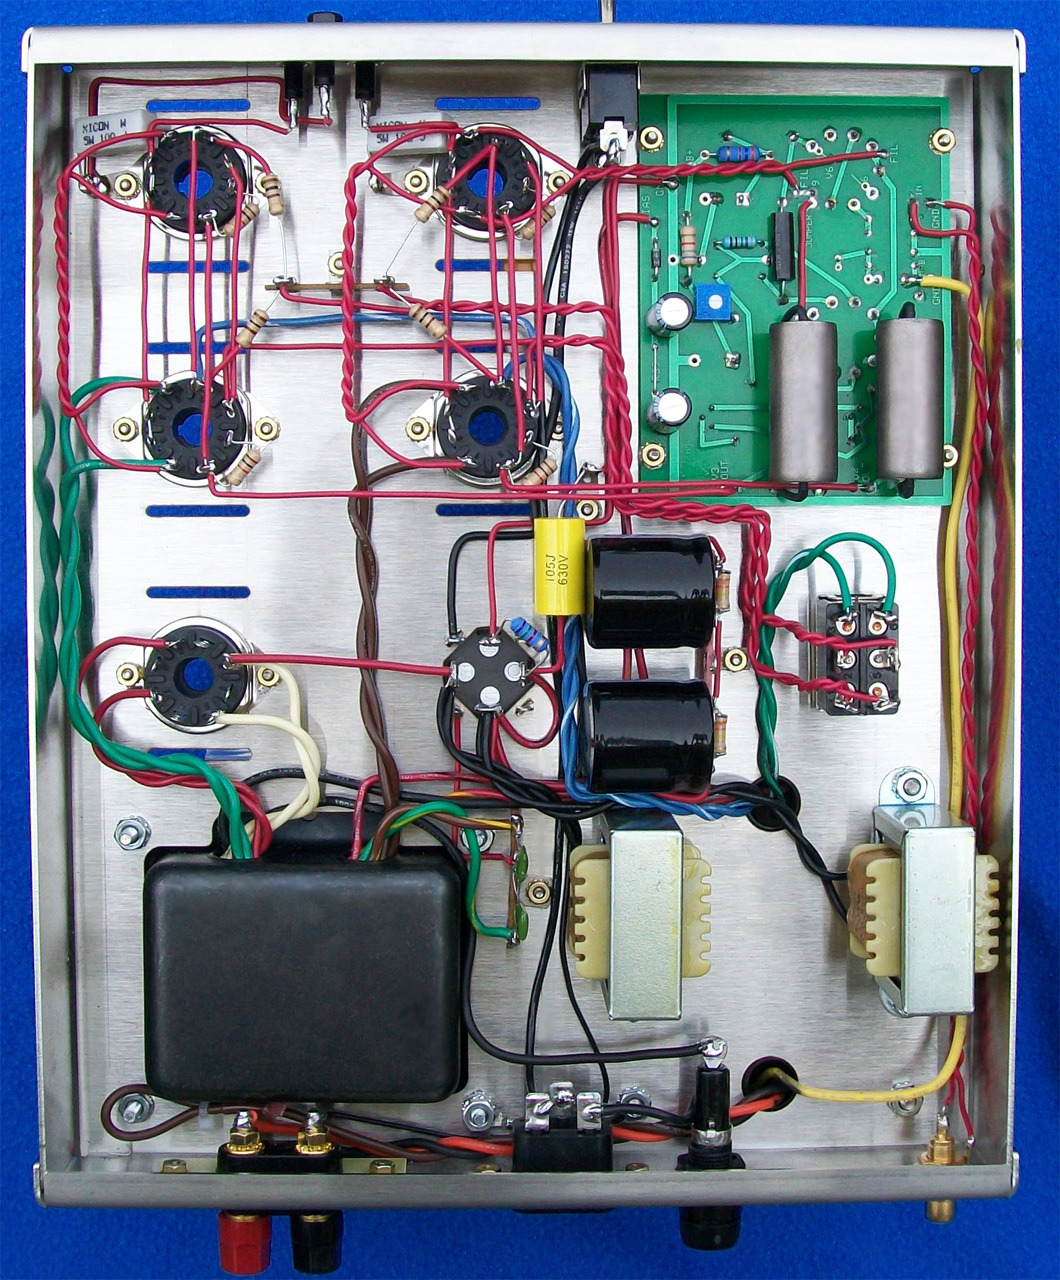
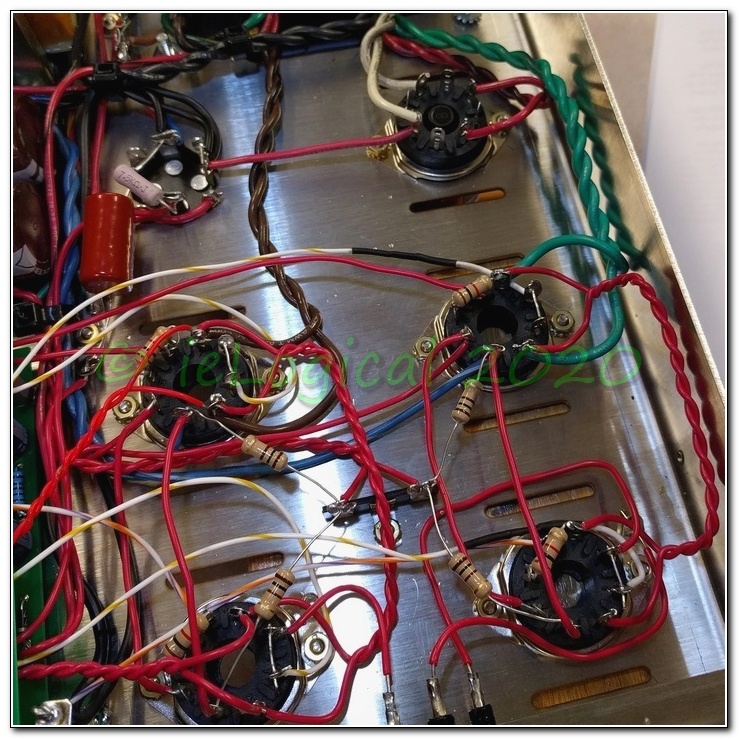
One
of the deciding factors to purchase factory assembled M-125s
was the quality of the wiring as shown in images on Tubes4HiFi and The Dynaco
Tube Audio Forum. The wiring delivered is not quite up to the images.
Additionally, driver board and tube complement may be somewhat arbitrary. The
M-125 web page, which appears to be well out of date, stated “The
recommended tube complement is ... 2 X 12AU7 or 12BH7 driver tubes”. Driver
board revision v16 w U.S. Sylvania-made NEW National
5963, a data tube similar to 12AU7, received March 2019. Opinions vary as to
5963 suitability as an audio tube, but like everything audio,
opinions are only valid in the system under test. From a
construction standpoint, US made tubes are insuperabile. In the
M-125, they are excellent wrt PL Chinese 12AU7.
In response to a query regarding the 5963 substitution, Mr. Latino
replied “In the last 9 years running the M-125s with 5963 driver
tubes...” which some might construe Bait and Switch recommending
one tube and delivering another.
Additionally, the 12AU7, 12BH7, 5963, 5814, 6189 or CV4003 Plate Characteristics
vary considerably. Changing willy-nilly upsets bias, gain structure and
distortion.
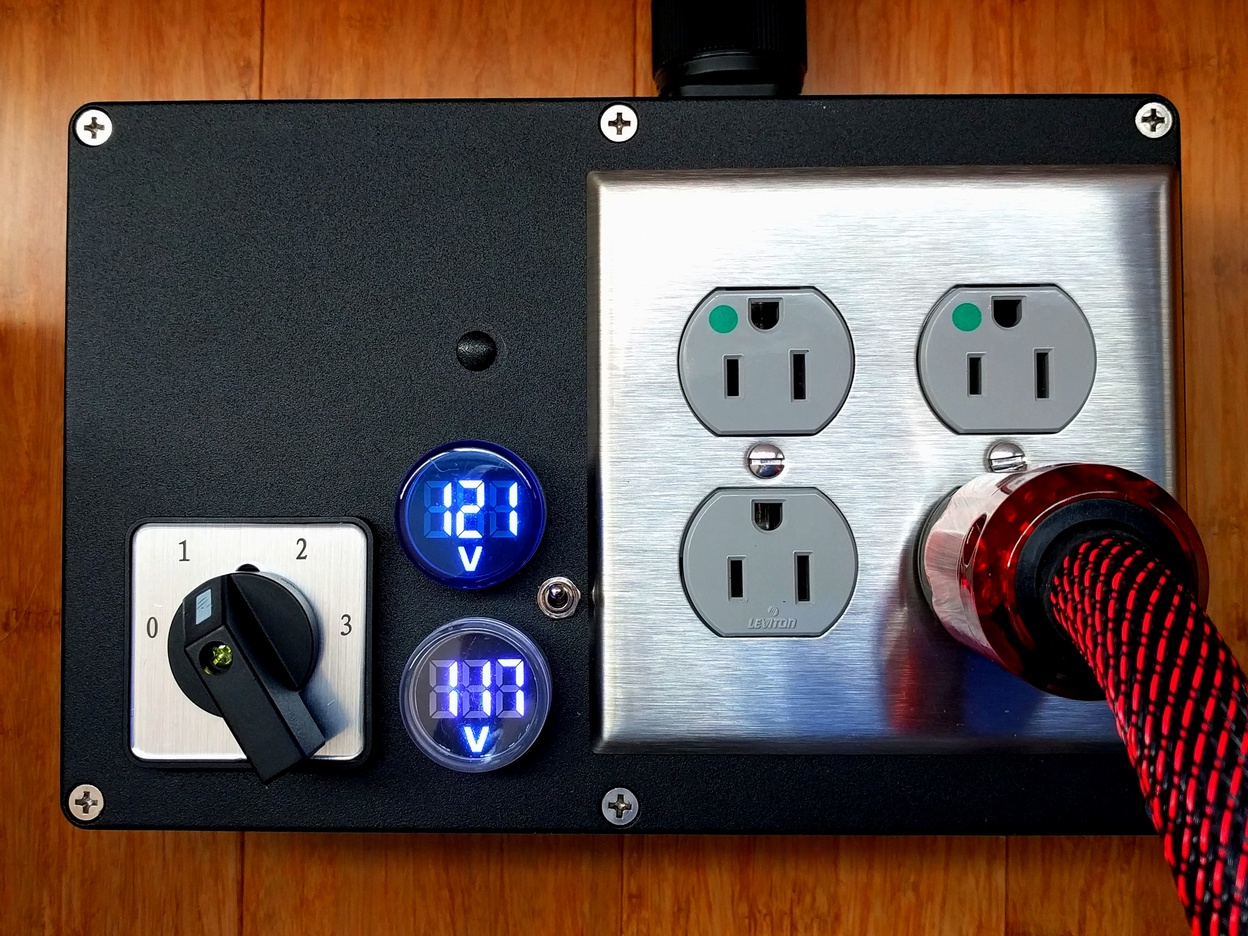
Interestingly, the 12AU7/5963 requires ½ the heater current of the 12BH7. Tube heater supplies are nominally 6.3vac ± 10%, with ±5% providing longer tube life. At 117v line voltage, with 5963/12AU7 tubes & 2xKT−88 heater voltage is 104% of nominal. v1/3 are 106% of nominal. v2/4 heater supplies appears designed for 12BH7 drivers with 2x KT−120s. If line voltage is anywhere near U.S. standard 120v, a bucking transformer is required with standard [2x 12AU7/5963 & 4x KT-88/6550] tube complement. Schematic, mechanical and parts list to build the pictured Bucking Transformer. Optionally, but not optimally, a variac may be used. Beware of cheap Chinese products recommended by Messrs. Latino & Mottram.
Other
tube combinations will increase the heater imbalance, possibly reducing SNR.
TWO tube, half-power operation requires further line voltage reduction to keep
heater supplies within 10% of 6.3v nominal with standard tube complement.
Mid 2020: Amps now ship with 115/120V primary transformer, obviating the
need for a Bucker or VARIAC.
Kit builders estimate about 10 hours to build an amp. There are less than 100
solder connections. An experienced builder making multiple sets with pre-cut
lengths should easily complete a pair in about 14 hours. The factory cost to
build is $817 or about $50/hr, a not unreasonable rate for an experienced technician,
plus about $100 for shipping packaging.
IF ONLY!
CAVEAT EMPTOR.
Hummmzzz...
After
repairing the broken switch, connecting up the amps, powering them on, I was
greeted with a buzzy hum!?!?!? The hum, audible from
1m, did not diminish with only the input shorted amps connected to the TC-50s,
not particularly efficient @ 86dbV.
Mr. Latino stated “My impressions are that you are 'over analyzing' the amp and its
circuitry when maybe you should just be listening to the music.” Right.
On amps with less than 55db SNR!
The 2019 system was minimal: CD6006 −> LC1 −> XO1 −>
Amp. LC1 & XO1 are self-designed passives. See Last Hurrah for
more details. AC power is dedicated circuit w 10ft run to AC panel. I have
multiple amps and ALL are dead quiet. The only Earthed
component is/are the power amp[s].
As a bit of background, my company, Studio City Sound Corp, designed and
installed recording studio wiring in Los Angeles. With monitor level on S
T U N, all one could ever hear is a slight thermal rush. Buzz? Humm? _
N E V E R !! _ Ditto my HiFi for the past ½ century. We
designed film scoring panels for studios such as Abbey Road, Hit Factory NY,
Sony NYC & LA, Paramount, NHK, Skywalker Ranch, Lucas Film,
Disney,... The
Vocal Splicer, distribution amps and other tidbits. I was head of Analog
Design @ AMS-Neve, perhaps the world's premier recording console
manufacturer, from 1996 to 1998. HiFi grounding is child's play compared to a
96 input analog console, 2x24 track, multiple 2T recorders, hundreds of
microphone inputs, outboard channels, tri-amped main monitors, 3 sets of small
monitors, multiple cue systems interfaced across multiple control rooms
and studios. I consulted w Monster Cable, Ibanez, Alesis, Yamaha and others
wrt the sonic quality of their products. I also designed satellite based system
monitors for ocean going freighters, ferries, tugs and large yachts. Bad
grounding at sea can be fatal to both personnel and ship.
After several fruitless “It's not the amps” emails,
I declined Mr. Latino's offer to return the amps.
surely you're joking, Mr. Latino?
Assembly Faults
Hand-built
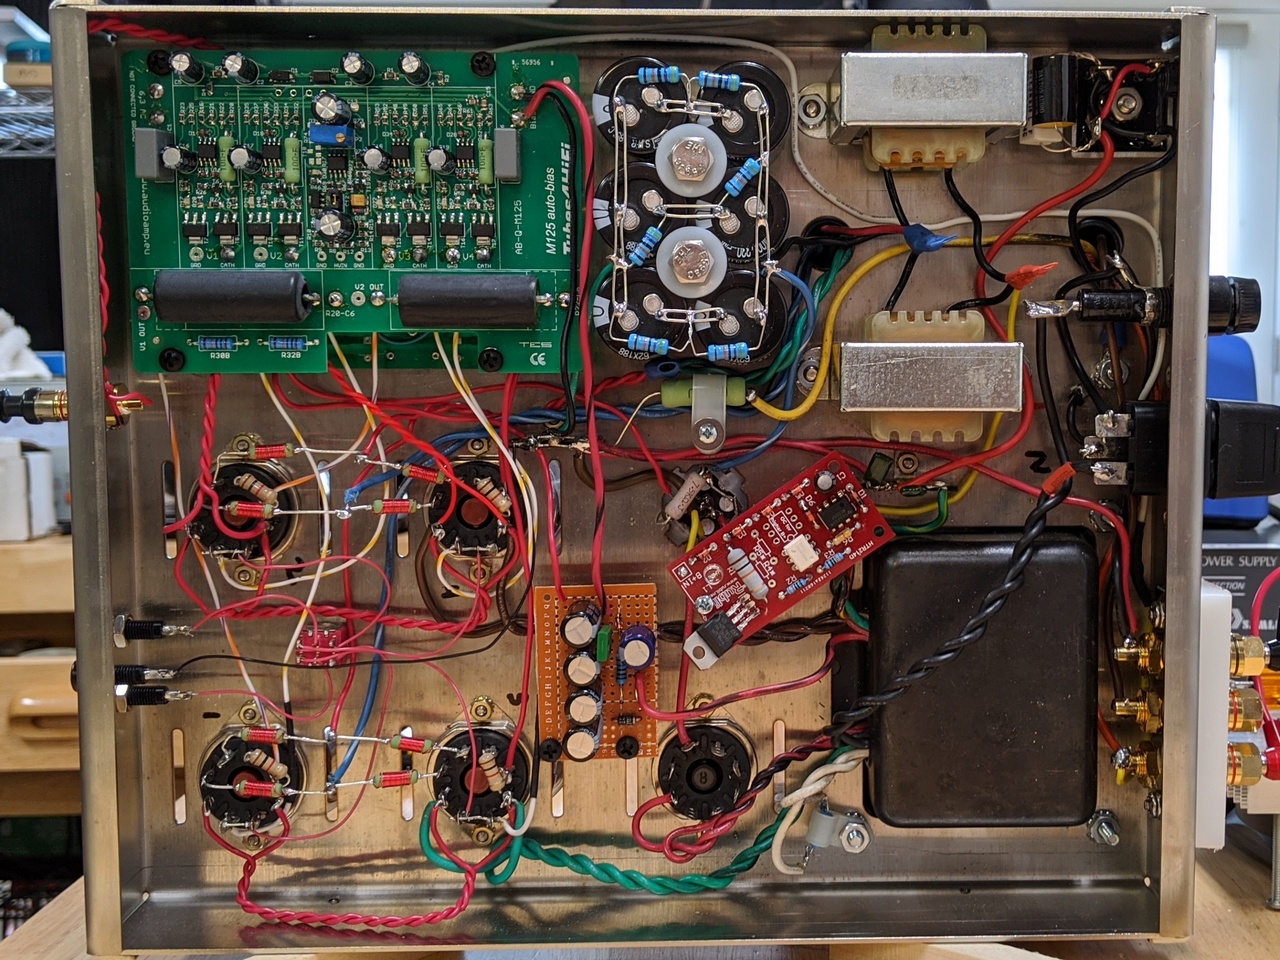
amps are not always pretty. These, however are just plain UGH-Lee! It
is appalling how poorly the amps were assembled by Ben/Benjamin “I
take pride in my soldering and quality work is of utmost importance to me” Woloss,
Tubes4hifi and VTA Amp Tech.
Amateurish. Slipshod! Unsafe!! Garbage!!!

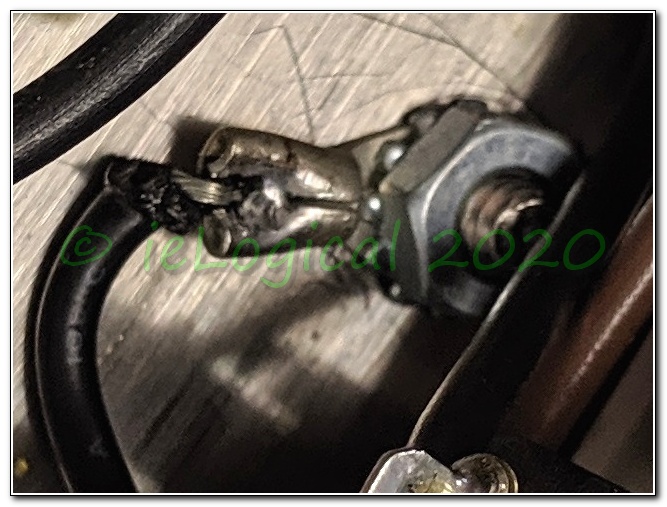
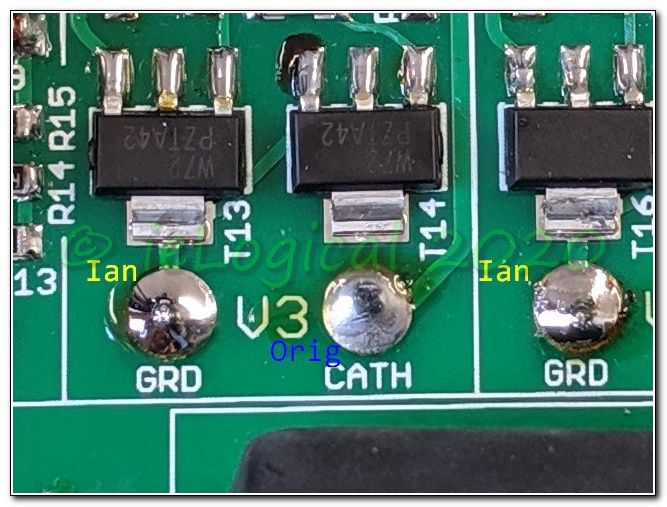

I would have been much further ahead had I returned them.
However, they do sound very good and seemed to have potential once quieted.
I do like a good challenge:
- Left Amplifier Faults
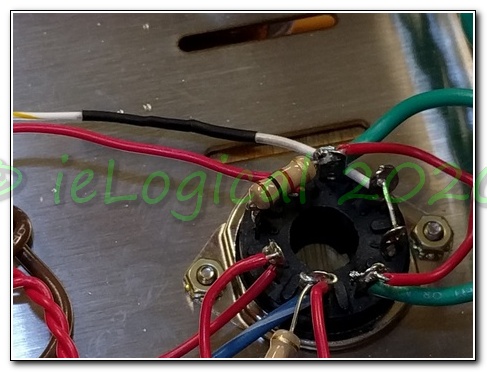
o • AB-Q board linked to driver with short crossed leads making service impossible
o • AB-Q R20-C6 lead across trace on solder mask, wire not in hole
o • fuse lead hanging wire, cold solder joint
o • Earth Safety cold solder joint
o • dry joint on Green Heater CT
o • nicked 6.3VAC power wires separated from AB-Q board leaving stripped end in hole when de-soldered
o • spliced 0vA lead on supplementary cap module
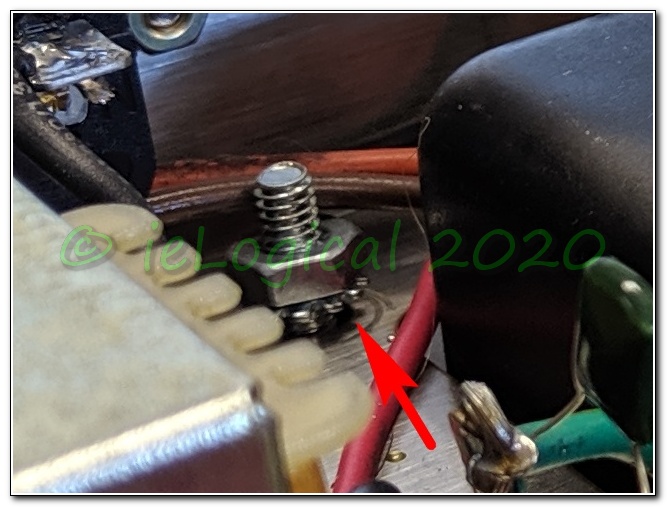
o • AuthentiCap loose, not well secured by tabs and prone to accidental chassis short
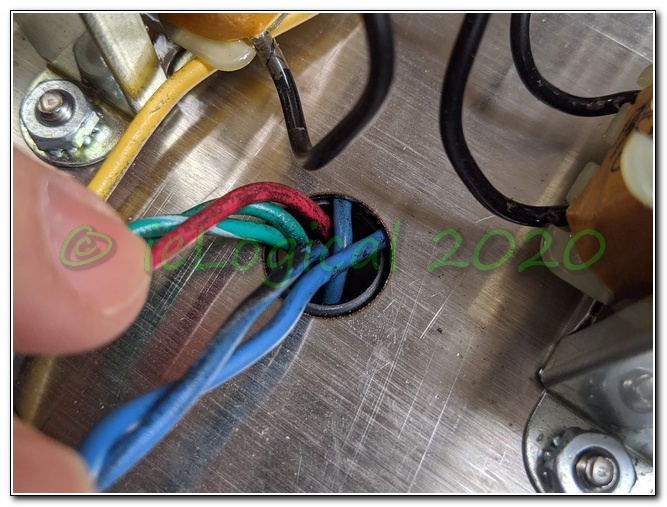
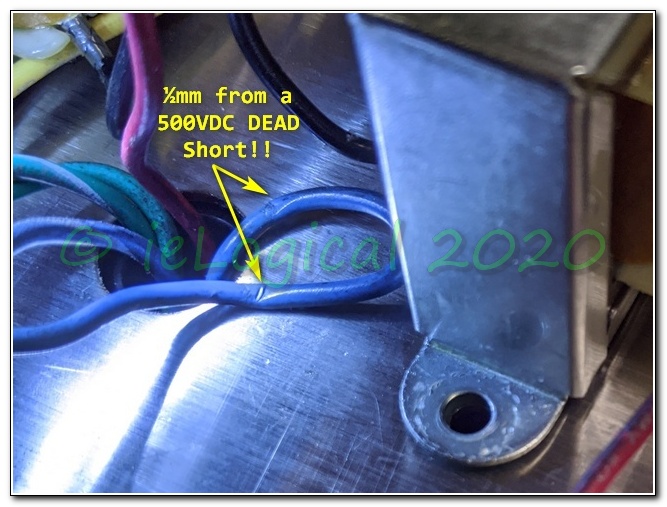
o • output transformer v2/v4 500VDC blue lead pinched between transformer and case
o • dry joint V2/3 fell off when adding snubbers
- Right Amplifier Faults
o • power transformer bolts not tightened, barely finger tight, 2 nuts not down to chassis
o • VERY POOR Earth Safety ground crimp
o • 0vA 'star' bolt barely snug - multiple 0vA lugs should have soldered jumper
o • fuse Holder not tight, about ⅓ turn loose
o • ESL cap solder to fwd 0vA lug, leaving long uninsulated lead exposed which could touch 0vA on AuthentiCap
o • AB-Q 6.3vac 0vA lead nicked and broke when de-soldered to fix polarity
o • v2 bias lead nicked, broke on AB-Q removal
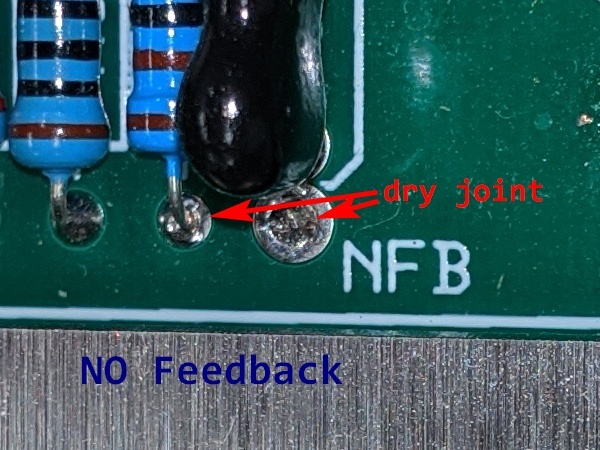
o • dry joint on NFB lead which showed up after about 150 hours
o • dry joint on r14 robbing v6 of current
o • R22-C8 lead to ABQ board fell off
- Both Amplifier Faults
o • AuthentiCap 0vA cold joint
o • dull grey solder joints indicative of low-temperature/dirty iron and/or movement during cool
o • insufficiently flowed solder 'tacks'
o • inconsistent assembly: some leads wrapped around terminals, some pass through, some just tack soldered
o • inconsistent wire lengths, twist, connections and solder joints
o • bias measurement jacks not snugged - required ½ turn to tighten
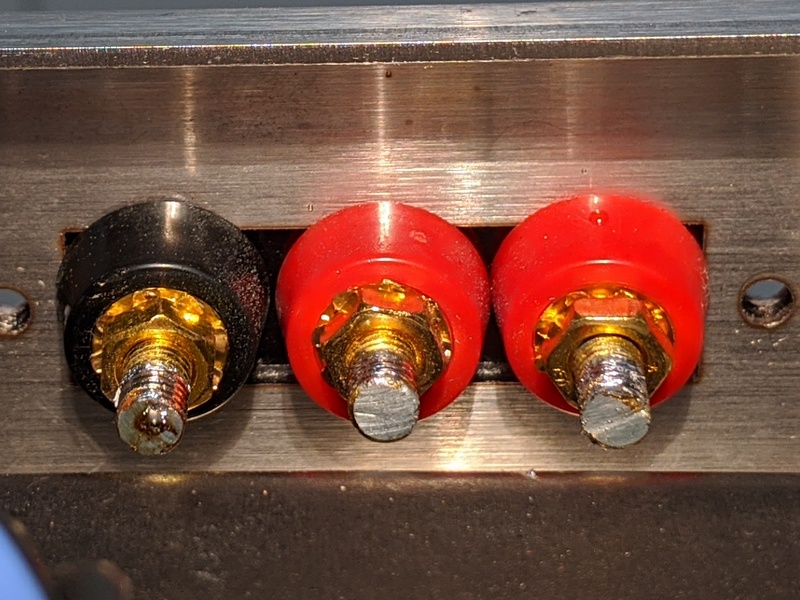
o • speaker binding posts insufficiently tight. Rotated when finger tightened. Required ¼ to ½ turn to tighten.
o • spliced AB-Q leads
o • inconsistent and wrong heater wiring for use in 2 tube ½ power mode
o • melted insulation
o • overly long wire strips leaving uninsulated 500VDC B+ unnecessarily exposed
o • uncleaned driver board flux blobs
o • speaker Black nuts stripped, plastic rotates and will not tighten on spade
o •
teflon insulated wire for AB-Q. Teflon is very difficult to strip w/o special
stripping tool.
That several leads broke indicates incompetence/wrong
tool
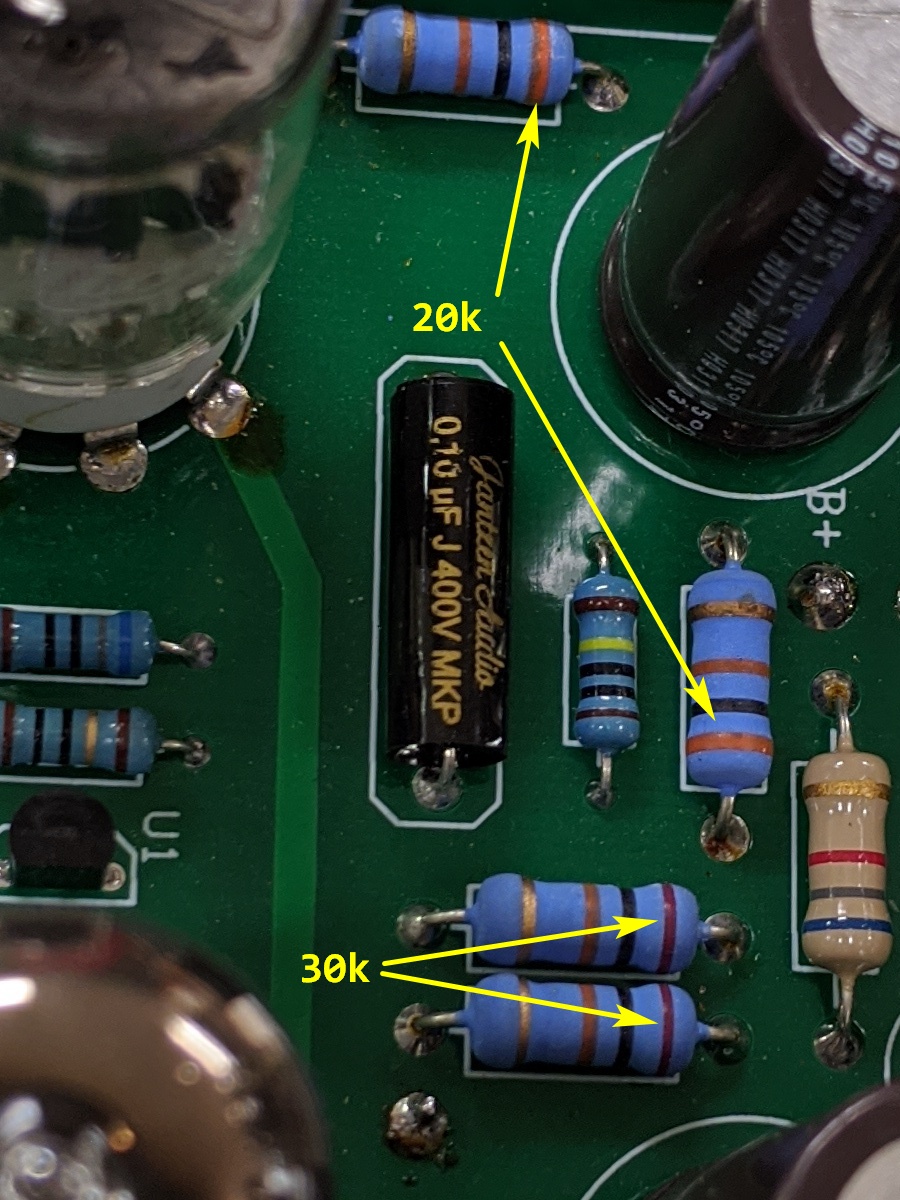
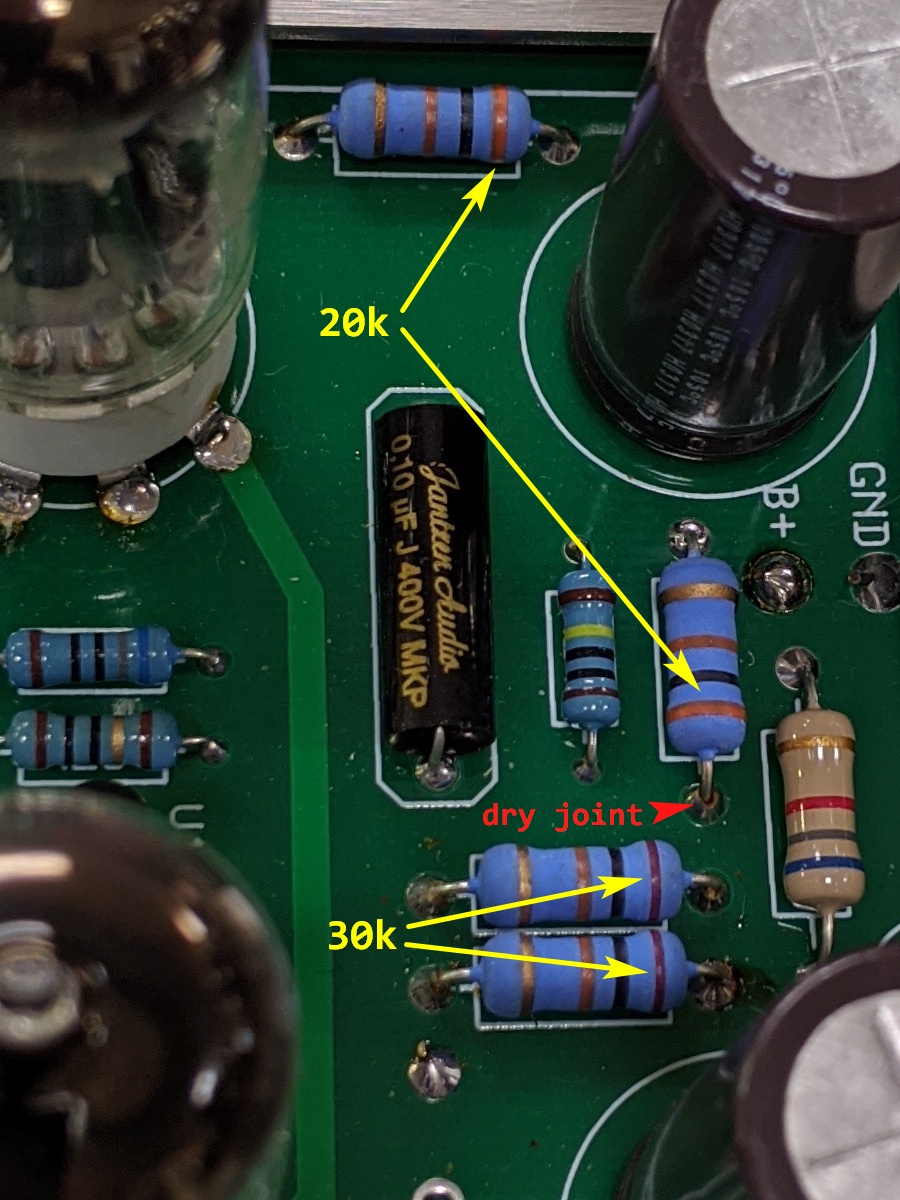
o • 20k & 30k resistors swapped starving v6 and applying 300vdc to v7 rated 250v MAX
Mr. Latino did not respond to email reporting assembly faults.
Design Faults
o • Power Tube Schematic REVERSES C6 & C8
o • Multi-point 0vA:
§ ⏚ AuthentiCap
§ ⏚ soldertab 1
§ ⏚ soldertab 2
§ ⏚ Earth Safety ground
§ ⏚ driver board mount
§ ⏚ driver board 0vA loop
o • Nichicon PT series driver capacitor voltage ratings are too low.
Rated
400VDC. Max applied voltage is 510VDC w/o tubes and 455VDC w tubes on 115VAC
line. Higher on 120VAC. Replaced w Rubycon 100µF 500V 10-12k Hrs @ 105°C.
Either a valve rectifier or B+ delay MUST be used. Rubli
HTR214 Rev D highly recommended. ≈27s delay and no
contacts to degrade, unlike Tubes4HiFi / VTA
TDR offering. The Tubes4Hi&thinsp/ VTA
TDR board holds off the 415VAC to the rectifier. As this winding is unloaded
until the relay closes, the voltage will be considerably higher. Without
current limiting, the 8A/250VAC relay contacts are going to take a beating. The
TDR is not recommended with the AudioAmp AB-Q boards.
o • v7 LM334 CCS lacks temperature compensation.
Location causes L/R imbalance due to temperature drift. LMM334 case temperature oscillates 45-55°C over several minutes, concomitantly changing phase splitter current flow and thus, gain.
o • choke wiring poorly routed and fields reinforce
o •
DC wiring is cheap PVC. 20ga 600v 150°C Silicone preferred. 300v OK in a pinch.
Amazon.com
: silicone +20 gauge +solid -stranded
o • AC BIAS wiring run next to DC
o • unterminated tube rectifier heater winding
o • 120VAC power wiring adjacent to DC
o • long audio input lead run through choke field
o • long feedback lead run through choke field
o • feedback and input leads run parallel
o • mismatched power transformer polarity
o • ESL capacitor location
o • v1&3 tubes should be mirrored and HT leads run between pairs for best CMRR
o • speaker jack binding post mount inadequate for heavy cables, jacks rotate
o • power tube sockets should use flat head screws or be atop the chassis to preclude KT‑88 rocking
o • non-standard 16mm speaker terminals spacing - 3 crammed into space for 2 - precluding better quality WBT or similar
o • Mode Switch contact rating is overkill for required current. Performance may degrade from non-use
o • feedback taken from 16Ω tap, compromising 8Ω & 4Ω distortion
o • marginal 75µF SCM w 8x ESR of Big C modification
o • marginal sub-chassis ventilation
o • stability components omitted
o • no output transformer no load protection
o • likely reuse of ST-120 power transformer which has two heater circuits with balanced loads. M-125 has two heater circuits with unbalanced loads compromising 60Hz noise
how bad can it be?
Per
Mr. Latino, pre-purchase [February 2019]:
“I had someone test the M-125s about 9 years
ago. He came up with a -95 dB signal to noise ratio. I do not know how that was
'weighted'. Typically with good input driver tubes, you have to put your ears
on the grille cloth to hear any hum/noise with speakers of average efficiency.”
All
measurements made on 4Ω tap. Unweighted SNR ≅
55db L / 51db R. Measurements made with shorting plug, amps connected to
4Ω 100W load resistors, both amps plugged into same grounded
outlet.
Either amp alone was somewhat quieter. Not quite ear on the grille
cloth quiet, but better.
With amps connected to source, hum/noise almost tolerable at
seating position 4m distant.
Jigs
Line
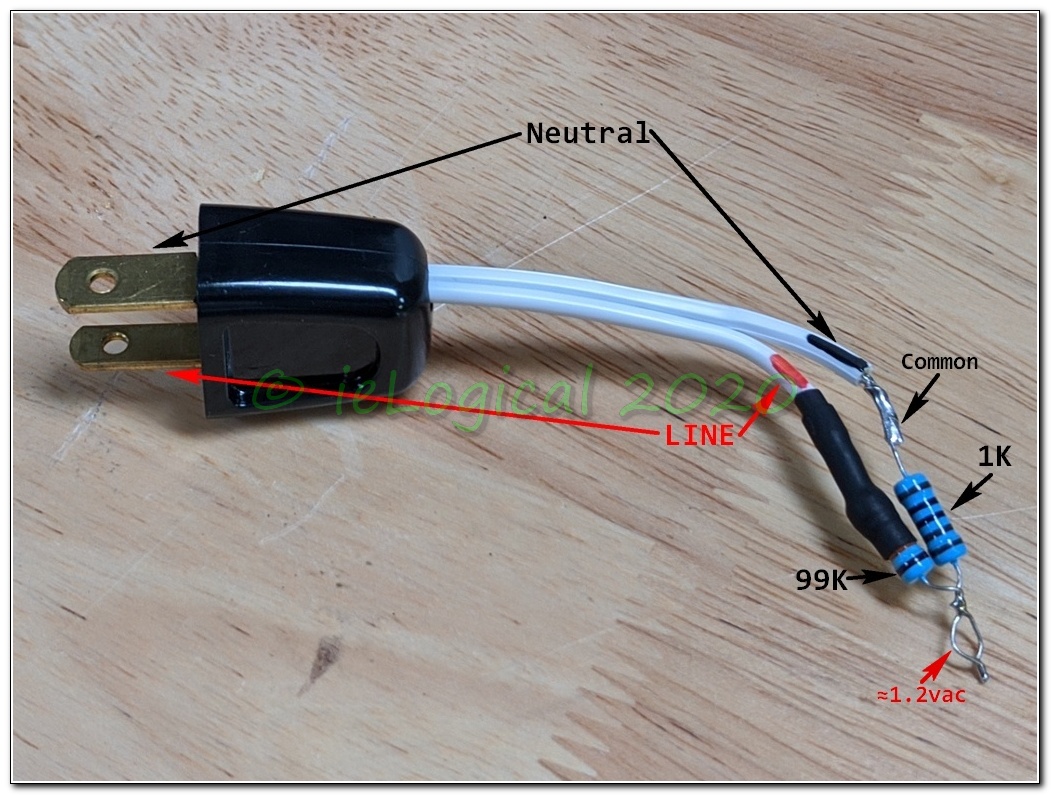
Sync Adapter: Gives a 100:1 reduction for use with scopes with reduced
input range and/or do not have Line Sync. DO NOT use this
before determining the power socket polarity is correct. A mis-wired socket or
power strip would put line voltage on the ground connection. If the voltmeter
does not measure ≈1.2vac S T O P !! and sort out
the fault.
This jig should only be used for initial transformer and heater polarity determination.
See Transformer Polarity Test for an alternate method of
determining heater polarities. Once polarities are determined, one of the
heater voltages referenced to 0vA can be used for reference.
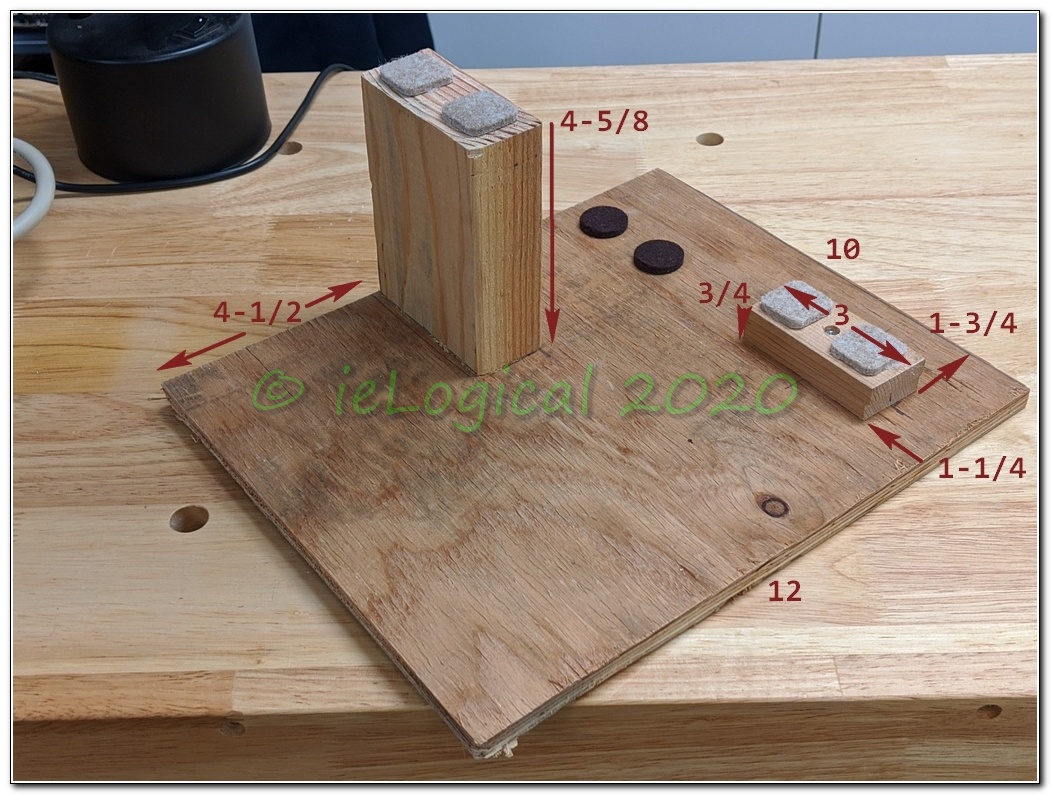
Build Stand: A pair of stands make working much easier. Heights are
ex-pads. [From similar on The Dynaco Tube Audio Forum]
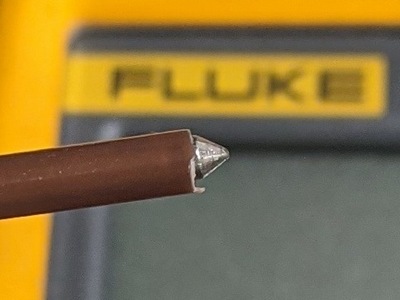
Tip Protection: Insulate all but the very end of the +ve probe.
This will help prevent letting the smoke out. All electronics run on smoke and
when you let it out, stuff stops working.
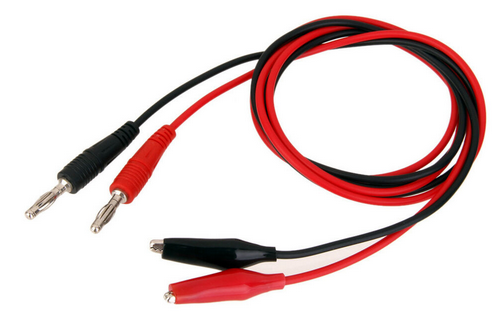
Clip Leads: Useful as a second pair of hands. When probing High
Voltages, use a clip lead for the reference, keep one hand in your pocket and
probe with the insulated tip.
Power Transformer Polarity
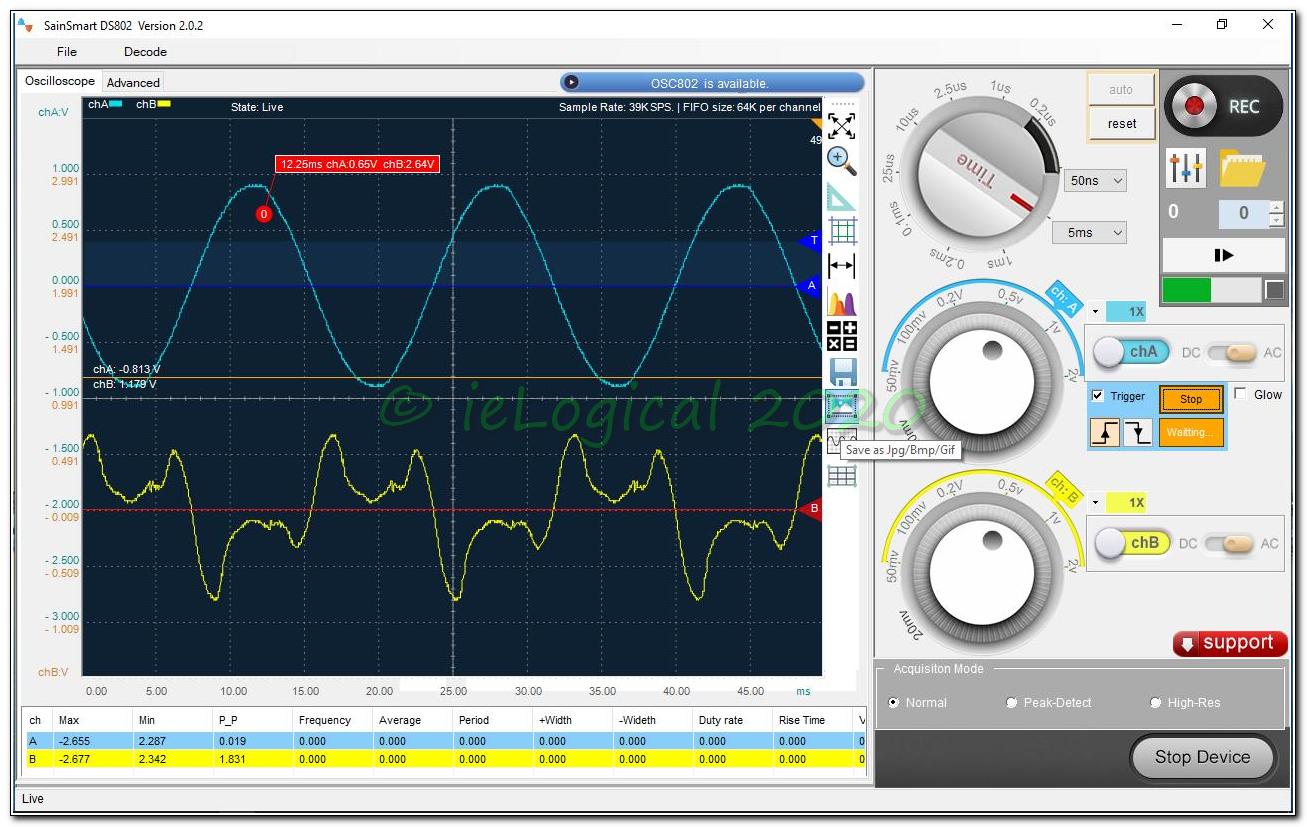

First
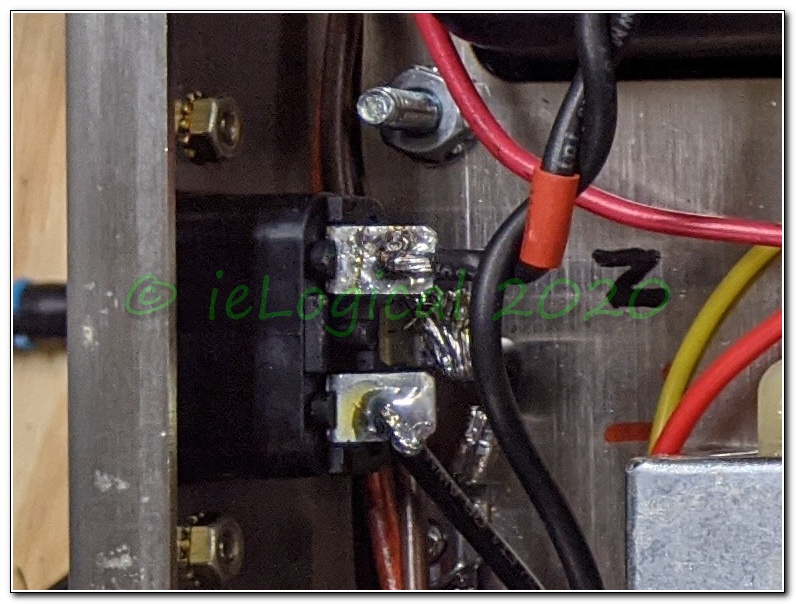
thing to check is the power transformer polarity. Since 0vA is tied to Earth
Safety, if the transformers are inverted, induced fields are inverted and may
increase noise. I've been checking polarities since the '70's and it often pays
dividends to correct.
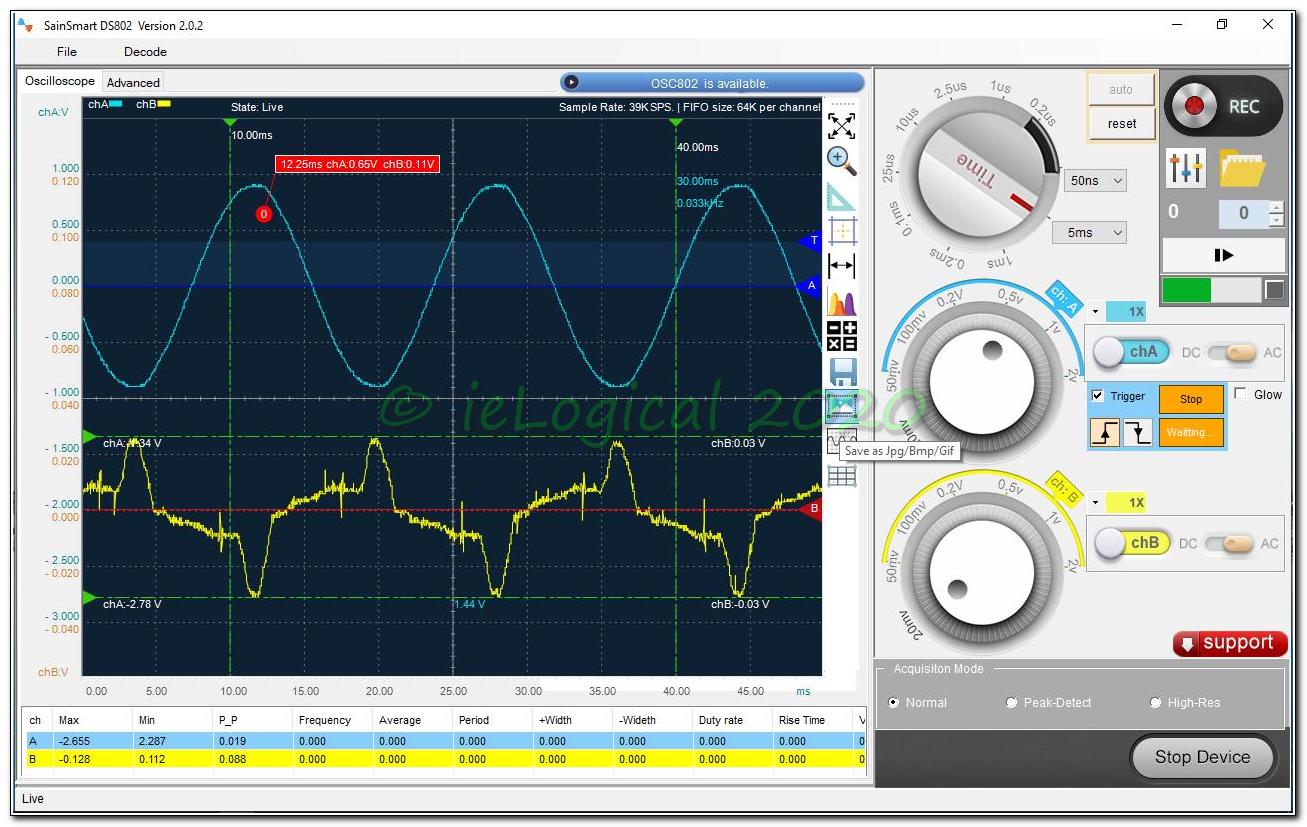
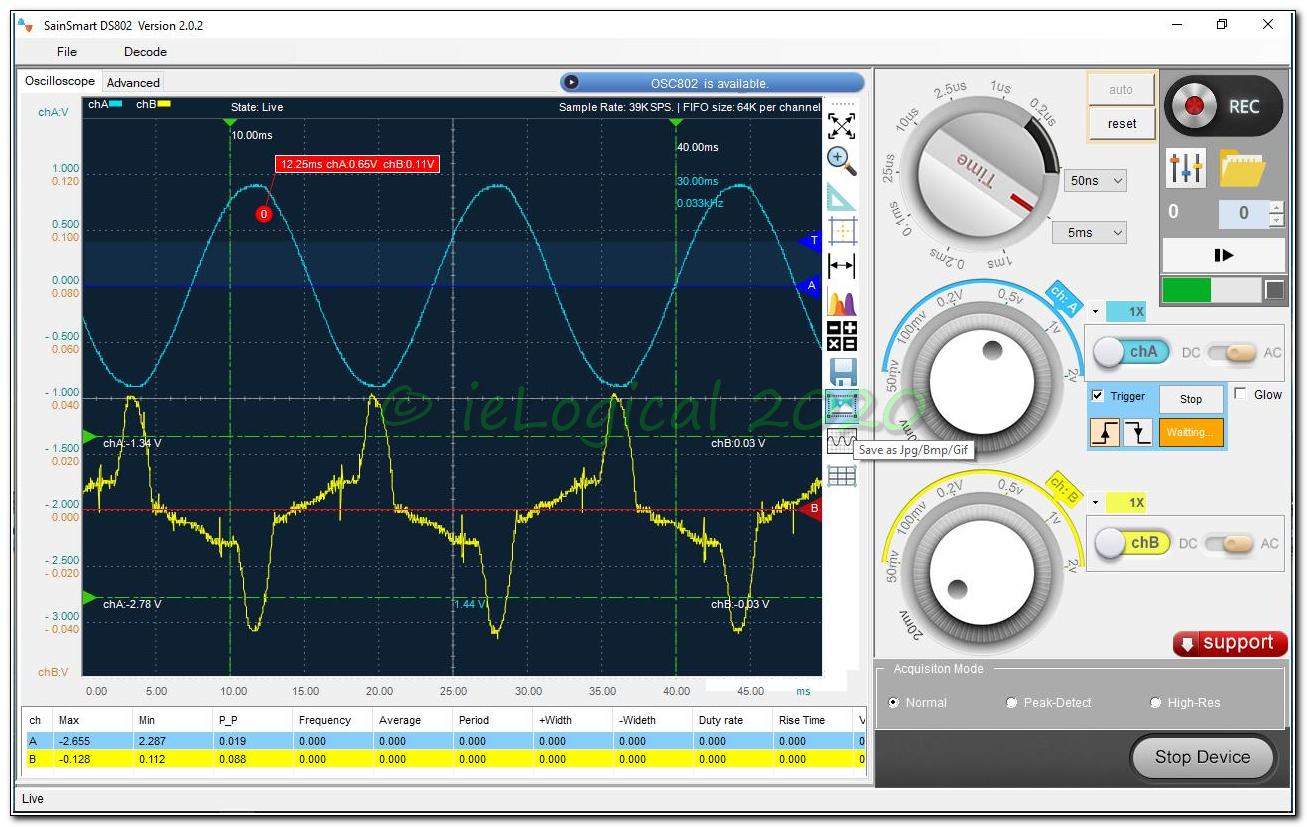
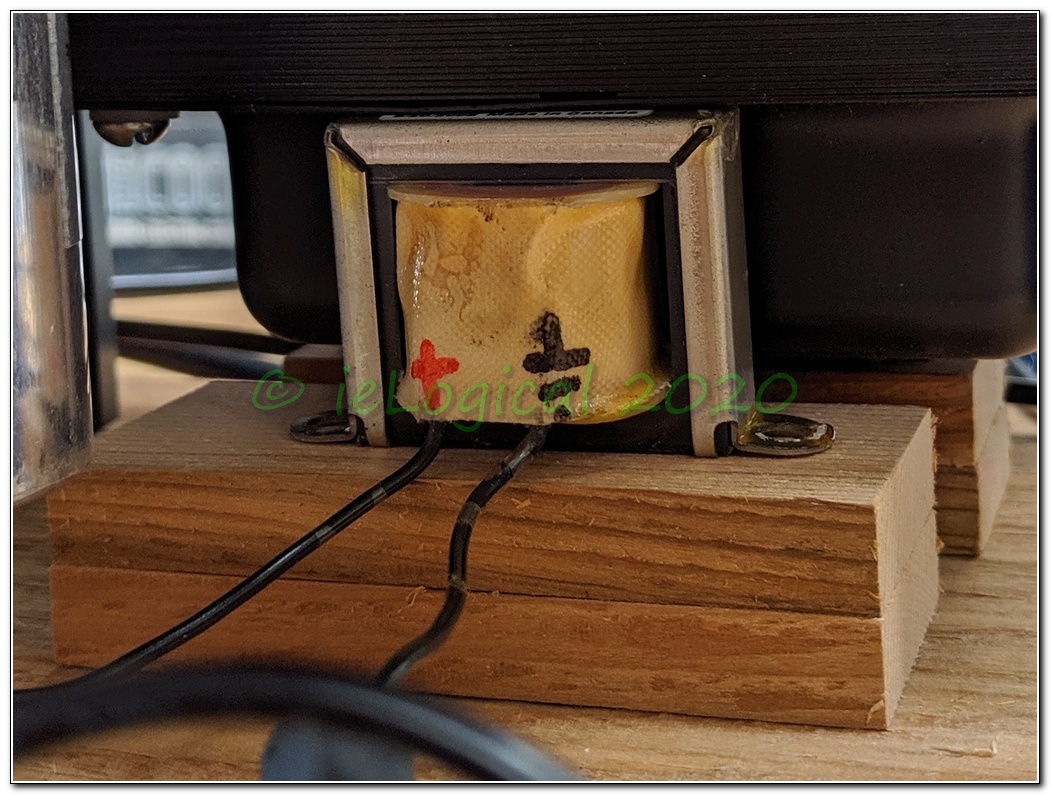
Polarity can be detected by means of a choke placed next to the power
transformer and the choke output measured with a scope synced to the line
frequency. Choke lead polarity is arbitrary, but marking it keeps measurements
consistent. Measure only one amp powered at a time. As can be seen, the power
transformers were inverted relative to one another. Choose the less noisy
polarity and mark the power transformer leads, fixing as necessary.
Subsequent to my amp delivery, VTA entered the mid-20th century supplying amps
with 115 and 120VAC power transformer taps. That should ensure correct
polarities, but it never hurts to check. I recently used a small 250CT
transformer, Hammond no less, with secondaries wired in phase. In other words,
0VAC between the taps. Neither I nor Hammond had ever seen similar and all Hammond
transformers are 100% tested. Hammond replaced it gratis.

The
drawing at left shows induced current flow with transformers with inverted and
correct polarity.
The lower block shows the effect of a correct Single Point 0vA. As built, with
the 9 point 0vA there is resistance between each gain block. 0vA currents shift
the reference. With a true single point 0vA, the relative voltage at each gain
stage does not shift.
Heater Wiring
The
build instructions correctly advise inverting heater polarities between v1 & v3
and v2 & v4 sockets. No mention is made of heater polarity for the driver
and AB-Q installation.
A feature mentioned on the website: “NOTE
- The amp may also be operated with just TWO OUTPUT TUBES - one of v1/v3 output
tube and one of v2/v4 output tube.” NOT recommended as
it requires rebiasing and increases heater voltages.
Given that there is no provision for determining output heater polarities,
arbitrary polarities on any tube pair could compromise SNR. If half power
operation is planned, ensure heater polarities are the same for socket pairs
v1/2 and v3/4.
PRIOR TO CONNECTION secondary polarity can be determined by
wiring the transformer in a series configuration. See Transformer Polarity Test. USE
CAUTION AND MAKE NO LIVE CONNECTIONS!!!

The
image shows the Heater Polarity concept for a Push-Pull [PP] amplifier. The
inverter stage splits the signal into inverted polarities. If Heater Polarity
is inverted, it functions the same as the signal and creates a current in the
Output Transformer. If Heater Polarity is the same, no signal is created in the
Output Transformer.
NOTE: For pairs of tubes, e.g. 4 output tubes, heater polarity should be
inverted between the tubes. Tubes in mechanically the same location, e.g. v1/v2
on the M-125 should have the same heater polarity.
For most tubes, improvement is slight as their construction accounts for heater fields. One caveat in two tube ½ power operation: Tubes will see higher heater voltage. Raising the A/C heater voltage with some tubes by 0.5V doubles the hum injection. Another caveat is raising the heater voltage shortens life. In an all out design, use an external regulated DC heater supply.
Heater Polarity Chart

P
is in-phase with line, N is out.
Polarity is best determined before the transformer heater wiring
is connected.
The right amp v2/v4 heaters were in-phase when they should
be out, contributing to the as built 4db SNR
reduction.
It was determined by inspection that Modified polarities produce the most
benign noise signature in the M-125s I received. Other Revisions might require
other choices.
I
do wish Tubes4Hi / VTA
were less circumspect in publishing revision changes.
With 16 M-125 revisions in 10 years, it's almost Amp of the Month Club!
DC Wiring

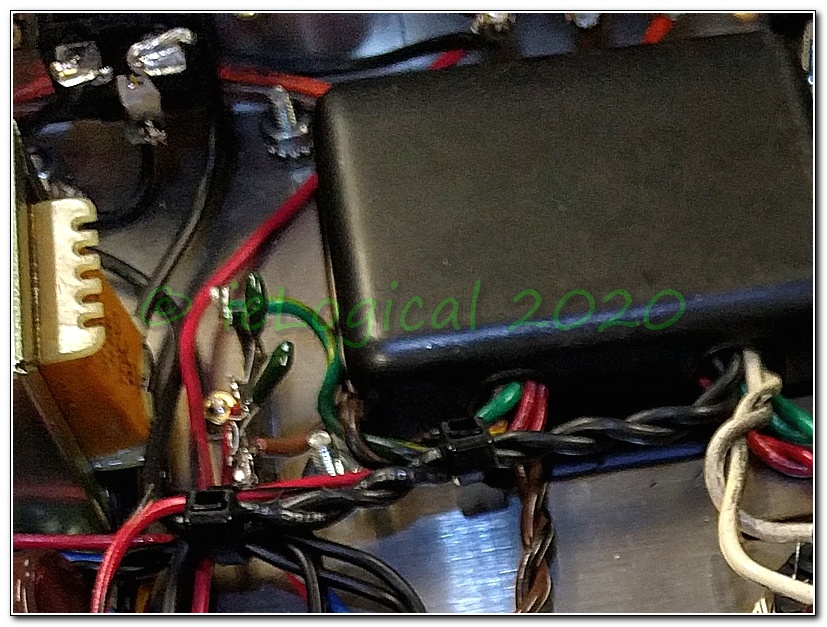
Prototype
at left looked reasonable. Wiring as built very poorly implemented. AC input
tie-wrapped to 0vA and DC. Choke input twisted with output contaminating the
output with the pulsed DC input.
Chokes are not counter-placed to cancel fields. Chokes sit directly
BELOW the Output transformer. Minimizing field radiation pays off.
Too much back and forth to the capacitors unnecessarily increases lead radiation and induction lengths.
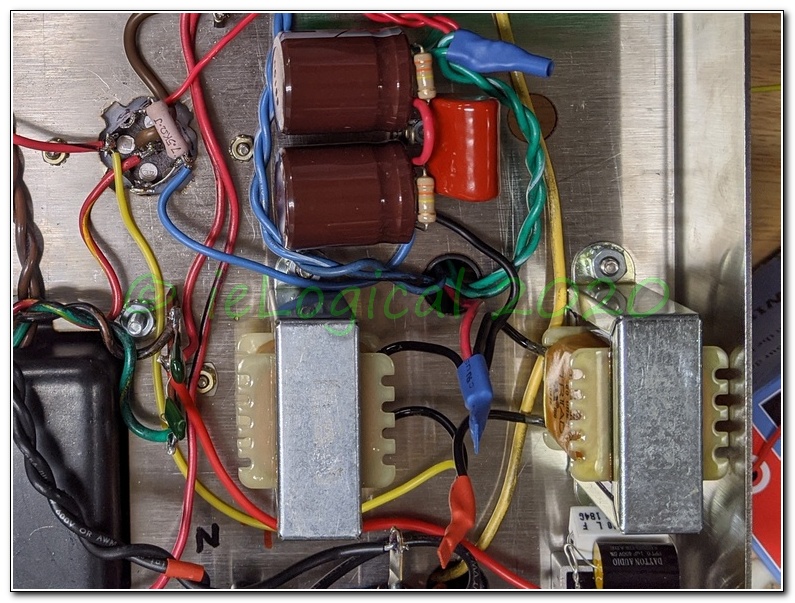
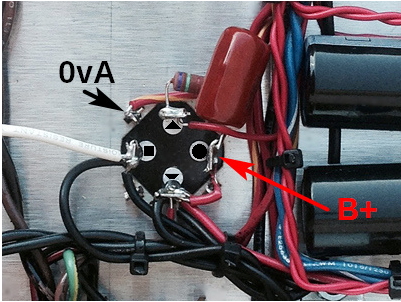
Mount
the chokes with leads inboard. Wire from the rectifier-out/AuthentiCap  terminal
to the rear choke leads. Wire the choke output direct to the AuthentiCap. Link
the AuthentiCap to the Supplementary Cap Module [SCM]. Connect the output
transformer RED lead to the SCM. Wire the linked
AuthentiCap
 &
 terminals
and the added black lead to the SCM input. Wire the ESL film cap across the
input and output of the SCM.
Space may be tight with the Pent/Tri switch installed.
Miscellaneous Wiring
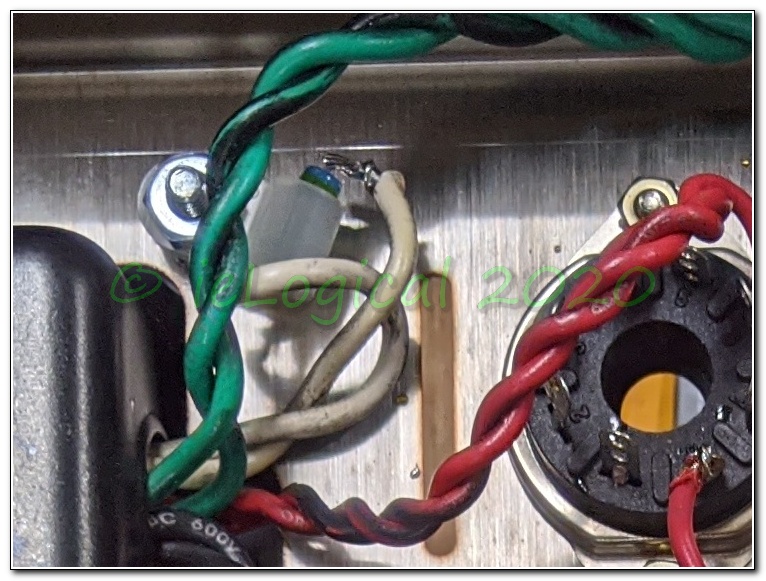

Rectifier
Heater: With a Ted Webber WS1-T solid
state rectifier, rectifier heater wiring is unused. An unterminated winding is
a potential noise source. If using a solid state rectifier, remove 5VAC
rectifier heater leads from socket, add a ≈5k/1W to terminate the winding
and mount off to the side to remove 120Hz pulsed 500VDC into the winding.
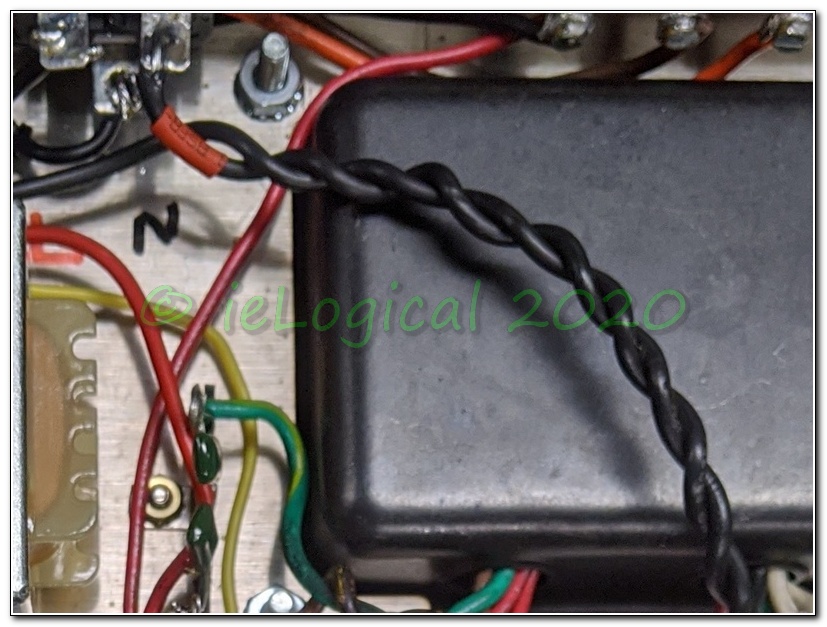
AC Input: With externally controlled systems, a power switch is
superfluous. It's never a good idea to run 120VAC leads in close proximity to
DC or signal wiring. Hard wire power transformer to IEC socket and route away
from all other wiring. If a power switch is required, mount it on the rear
panel. This will cut hum substantially.
Audio Input: Without the power switch, there a convenient hole on
the front panel for the Audio Input jack. In addition to short leads, the audio
input no longer passes through the choke fields and maximizes distance from the
AC power fields.
GroundLifts/CheaterPlugs are DANGEROUS, Irresponsible and in some locales, ILLEGAL!!
Single Point Ground
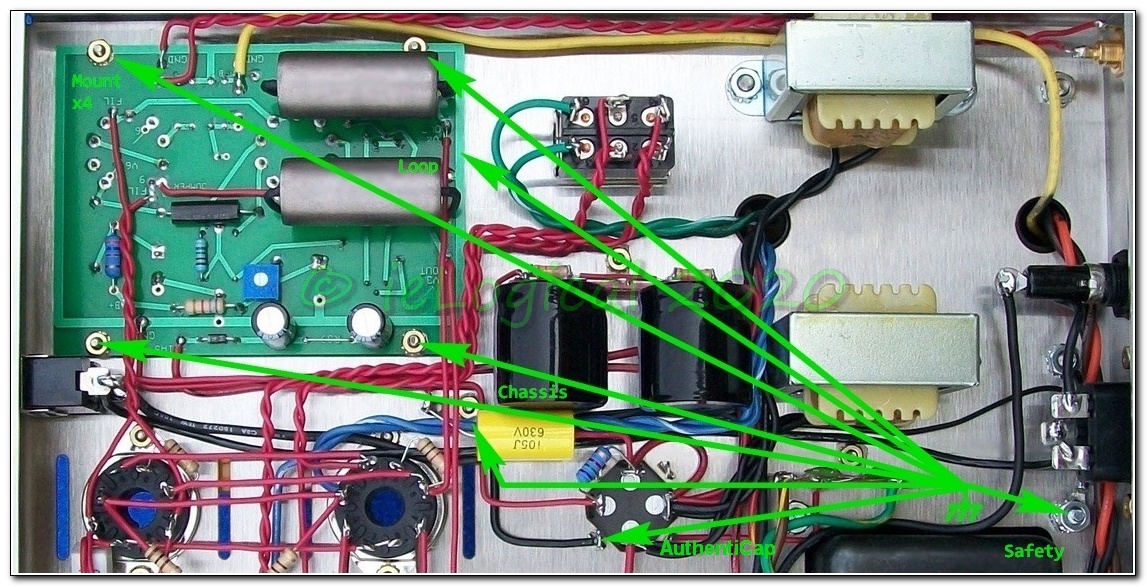
Although
the M-125s are MonoBlocks, functionally they become one amp when connected to a
common source due to their unbalanced inputs. With the Earth Safety ground
connected to 0vA, Ground Loops are almost a certainty.
Rod Elliott has a very good page on Earthing and Ground Loops in
particular. The bottom line is that there should be only one 0vA point. FULL
STOP! The Earthed chassis should function as a Faraday cage only and
ne'er the twain shall meet.
As designed, the M-125 has a 9 point ground. Never good.
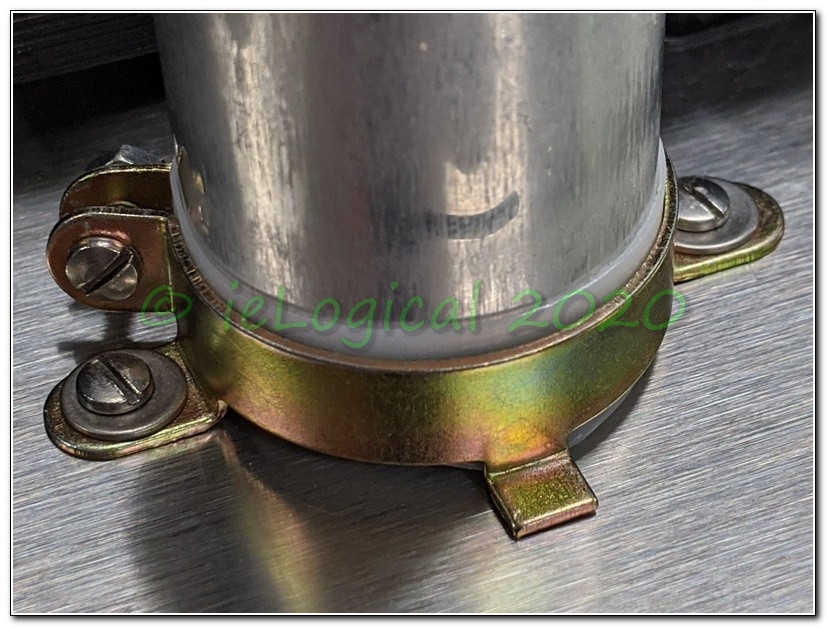
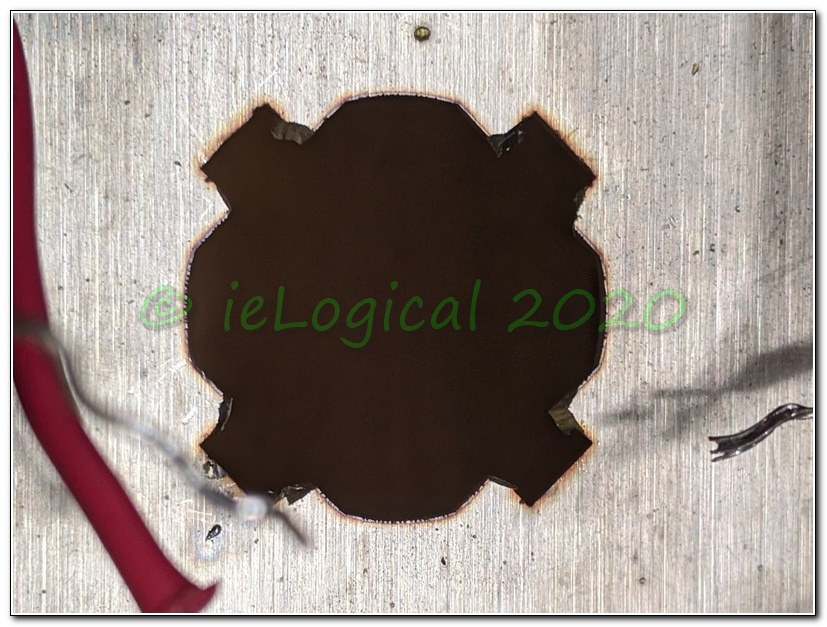
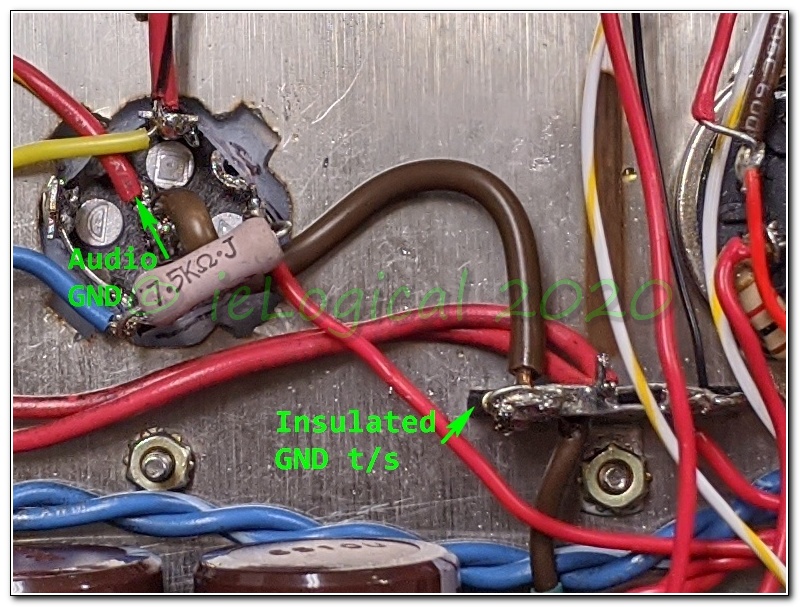

AuthentiCap: Other
than cachet, why use it? Small value caps have much higher ESR. Sticking
multiple caps in a can reduces the temperature rating / life
at temperature. The impedance of different value parallel capacitors is
exceedingly complex and may contribute to observed instability. D U M B !!
Add clearance for 0vA tabs. Insulate it from the chassis. Mount it securely with
a clamp! Bend the ground lugs inward and add a shorting link
across two, connected to the 0vA Star terminal strip. Wire transformer 0vA to
this link.
GND Star Point: Replace the ground lugs with an insulated terminal
strip similar to the one used for the triode mode resistors. Add a buss through
the lugs. Link to the AuthentiCap 0vA and solder all ground leads here.
BIAS Wiring: Remove BIAS lead from wire loom and run down middle of
power tubes. The pulsed ½ wave rectified DC has no business loomed with
Audio DC.
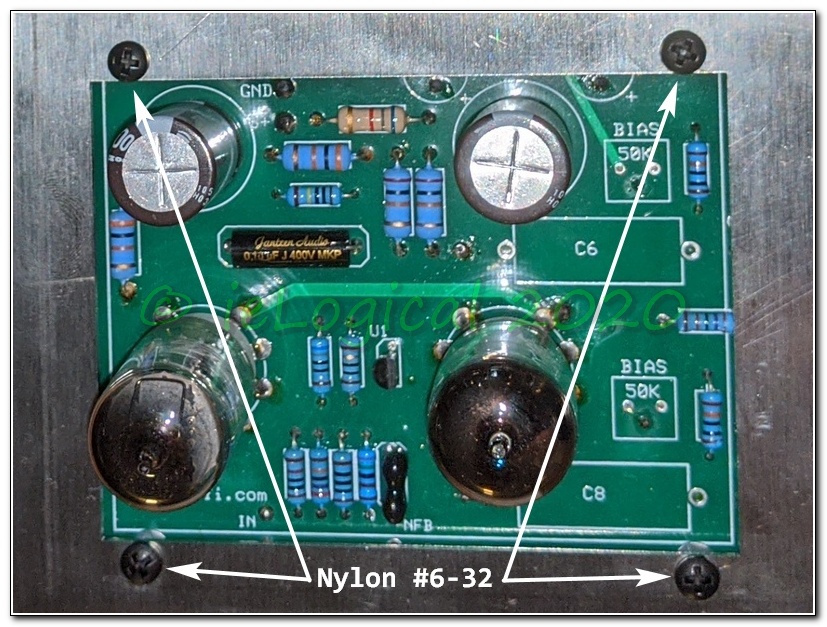
Driver
Board Mount: Replace the 4/40 steel hardware with #6 [3.5mm] nylon
screws and stand offs. If using the AB-Q board, its mounting holes need
drilling to fit #6/3.5mm hardware.
McMaster-Carr #6 for isolated 0vA:
• #6-32 x 3/4 Hex SO 92319A658 • #6-32
x 3/8 Pan Head 94735A729
• #6-32 x 5/8 Pan Head 94735A732 • #6-32
x 1/4 Hex SO 92319A610
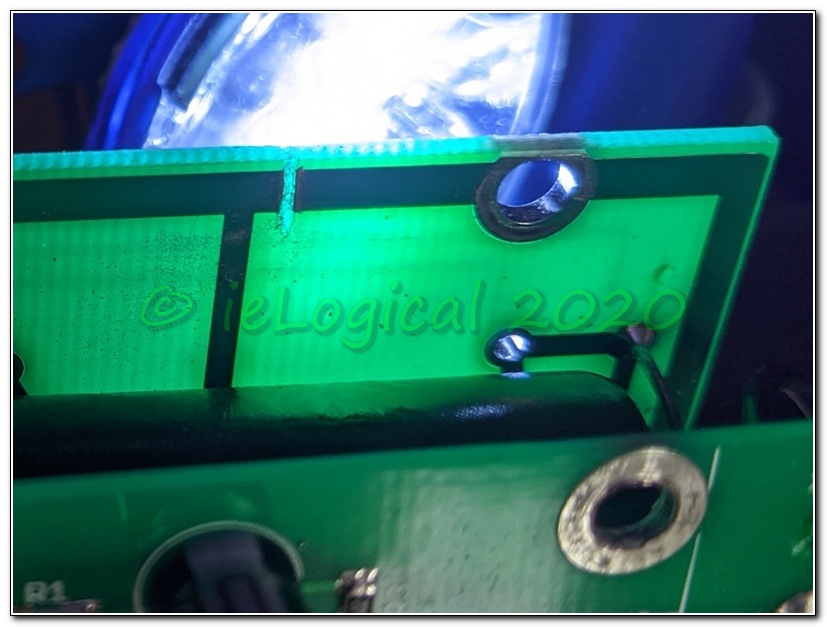
Driver
Board 0vA Loop: Verified M-125 Driver
v16 revision ONLY. The driver board ground runs
around the outside of the board, the very definition of a loop. From
inspection, it appears the loop to the right of the vertical trace is for bias
and the left for audio. Cut the loop to reduce the effect of the shared
bias/0vA. Be certain and careful IF doing this revision!!
Other versions likely have a similar fault, but the cut point may be
different.
making it safe

Per
the Loop
Breaker schematic on Rod Elliott's page, add a 50A [10x device 5A
fuse] diode bridge linking 0vA to chassis/EarthSafety ground. Cap provides RF
sink. 10Ω/5W resistor is somewhat arbitrary, with values from 10 to 100
ohms generally regarded as satisfactory.
Amazon: 2x 50A diode bridge Parts
Express: 10R
resistor • 100nF
capacitor.
Space is tight, so it is necessary to enlarge the right-rear output transformer
chassis hole slightly to 11/64 in. [4.5mm]. A #8 x 1 in. bolt is required. Link
0vA at the heater ground buss. Tie the Earth Safety link at the same bolt as
the AC input Earth Safety.
things are looking up

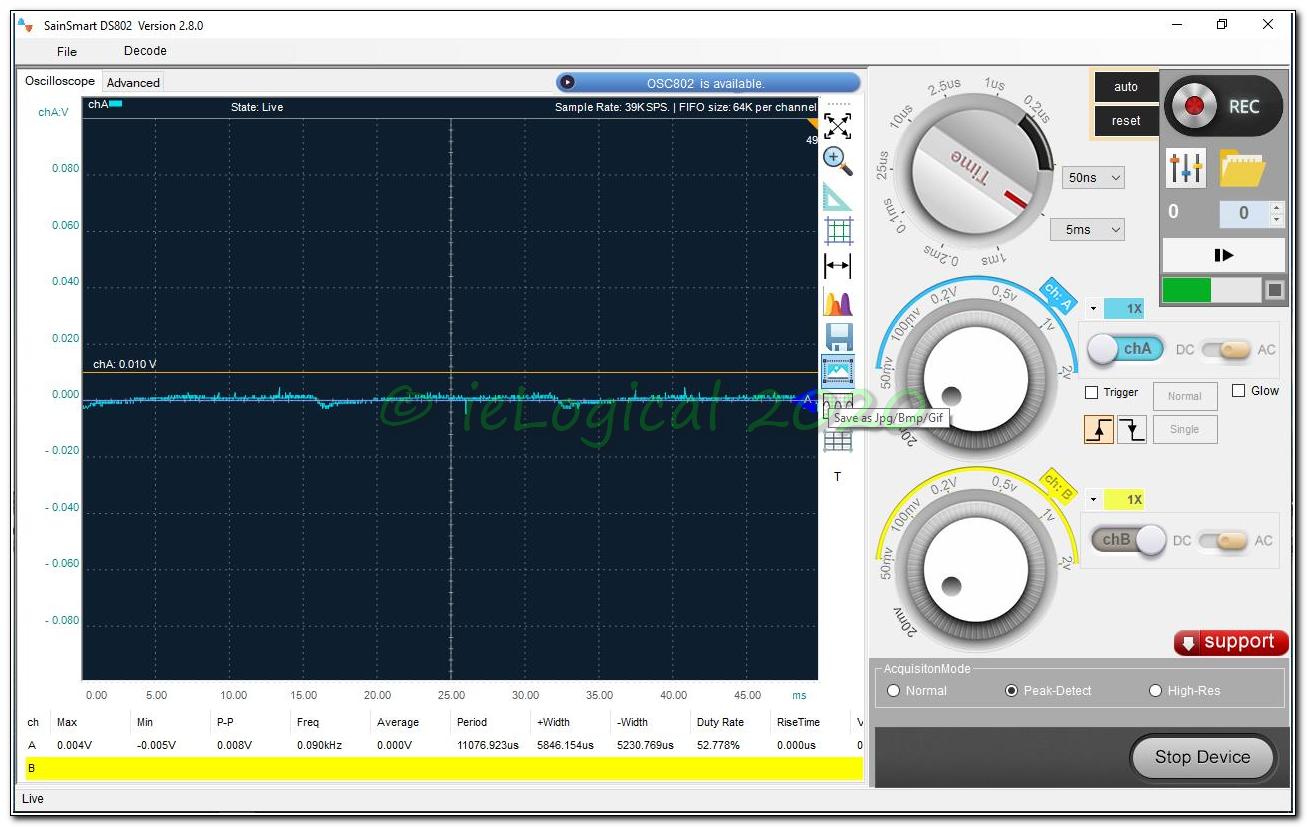
Unweighted SNR ≅78db L/R. Still not quite the 95db someone claimed to have measured. The waveform however is a dead giveaway for the half-wave bias. Shame on you, Messrs. Mottram & Latino. A full-wave bias would reduce current pulses by 50% and double the frequency decreasing the noise by 12db w bias LPF mod below.
An additional benefit would be obtained having a separate bias center-tapped winding rather than half-wave tied to the HiV CT [0vA].
be careful, your bias is showing
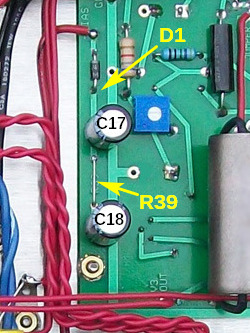
Note that some schematics have incorrect C17 & C18 RefDes.
R39, shown here as a link, should be 1kΩ to improve noise performance.
Better filtering can be achieved by changing R39 to 470Ω and inserting
470Ω between D1 and C17 as shown below.
The correct AB-Q connection point is the C18 end of R39.


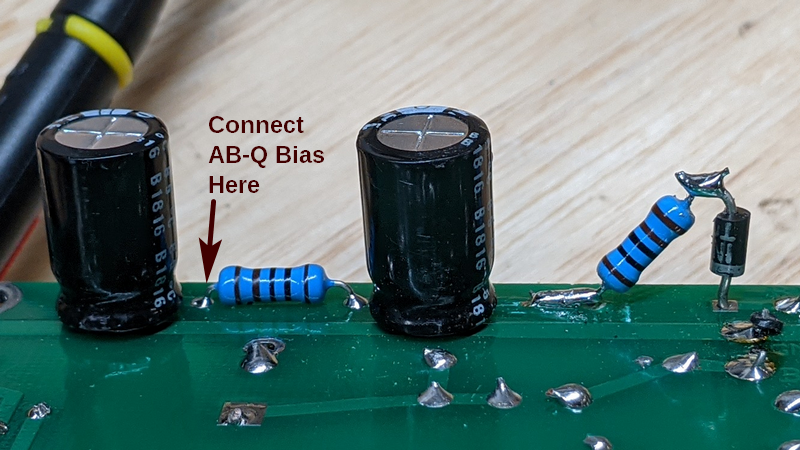

Bias noise without AB-Q can be reduced substantially by adding a 1kΩ resistor between D1 and C17. The shown position is for clarity. The diode and the resistor should be flat against the board. All moot with DC Bias below.
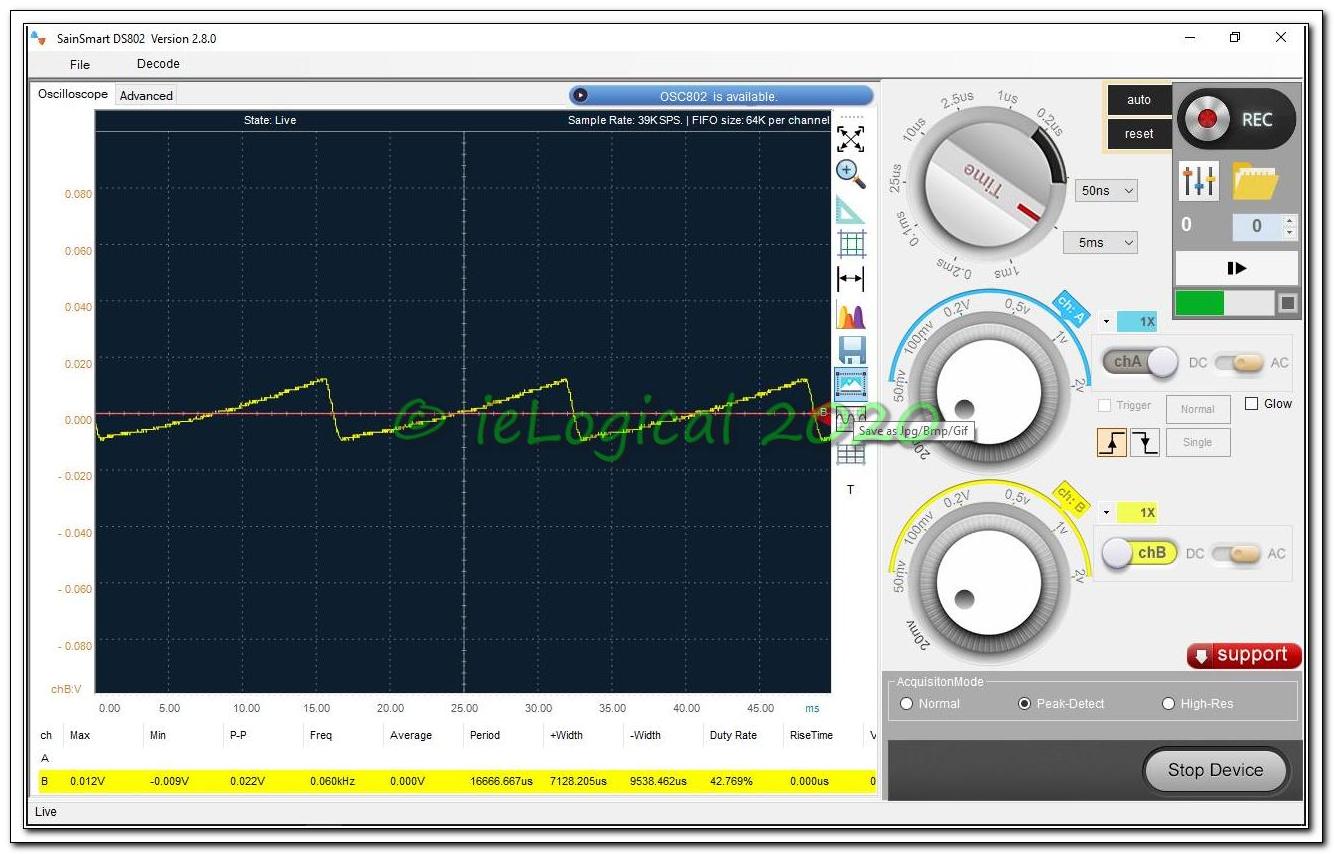

Left
image is v4 bias as delivered. A classic ½-wave rectification with
minimal filtering.
Holger @ Erhard Audio,
U.S.A. agent of the AB-Q AutoBias, was kind enough to tell me that replacing
R39 on the driver w 100Ω would allow enough current for the AB-Q board and
a little more LP filtering. Move the bias lead to the C18/R39 junction.
Optionally, a better filter can be implemented with 2x 470Ω, one replacing
R39 and the other inserted between the D1 anode and C17. This should probably
also work for standard bias without AB-Q. See Power schematic.
Right
image LP filtered bias is 13db better - but not as good as a full-wave
regulated DC supply.
Maybe later... arrived. ALMOST. See Regulated Bias below.
AutoBias is EXCELLENT! All tubes hold idle @ -0.500v
-0.001v/+0.000 and do not drift. With steady state signal applied,
they hold precisely. A much better AutoBias implementation than on
the PL5. AutoBias was not measured as built, only on the corrected build.
it doesn't get any better than this

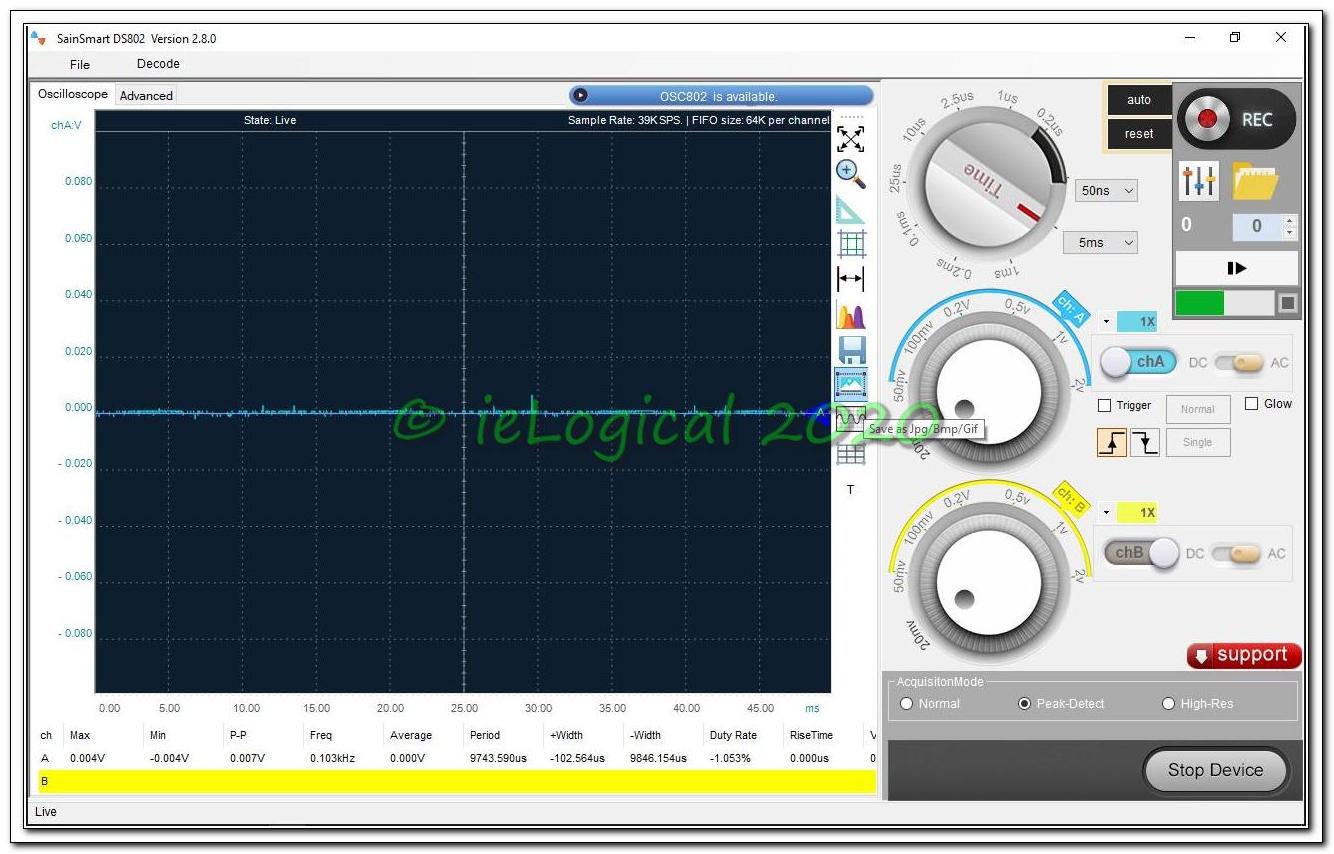
Unweighted SNR ≅93db L/R. I have to put an ear ON the grille cloth at the woofer to hear anything. Additionally, notice how little hash is present. Absolutely NOTHING can be heard from the tweeter, a vast improvement!
Mr. Latino did not respond to a friendly offer to tell him how the amps had been quietened.
ok, maybe a little better
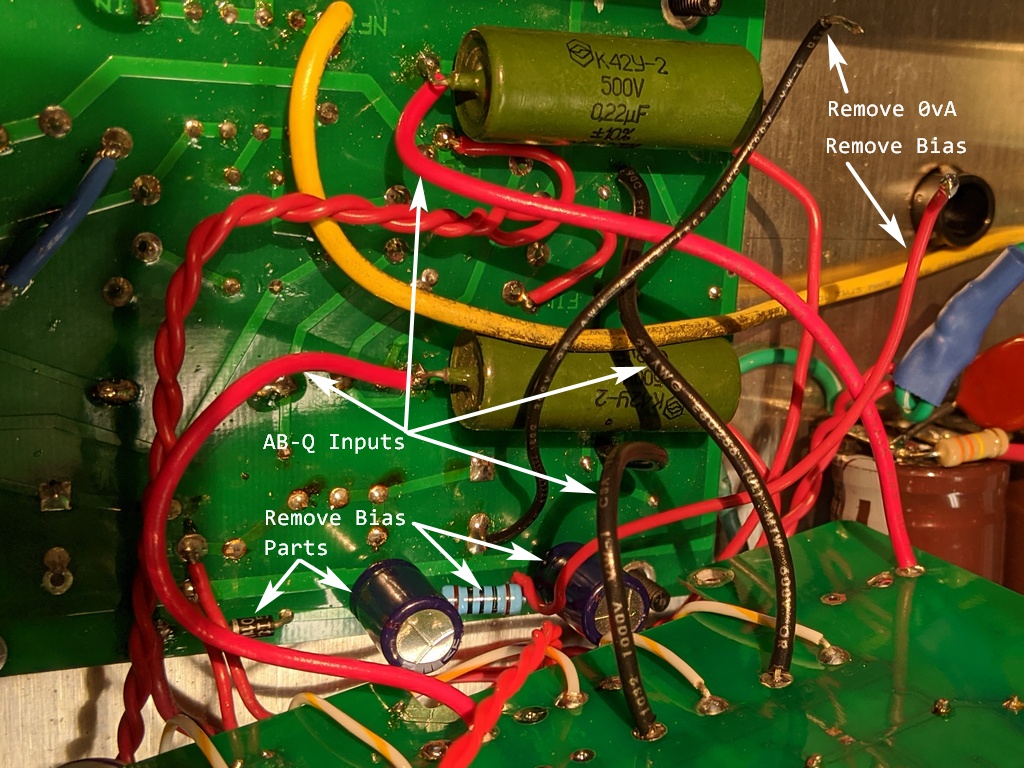


The
AB-Q board handles Bias. There is ZERO need for any Bias on the driver board.
Construction of a well filtered bias supply mounted off the driver board
reduces bias noise.
Power tube current is returned to the AB-Q board. AB-Q 0vA should be returned
to 0vA star. First image is recommended AB-Q connection, wires and parts to
remove. Second image is bias supply to AB-Q board.
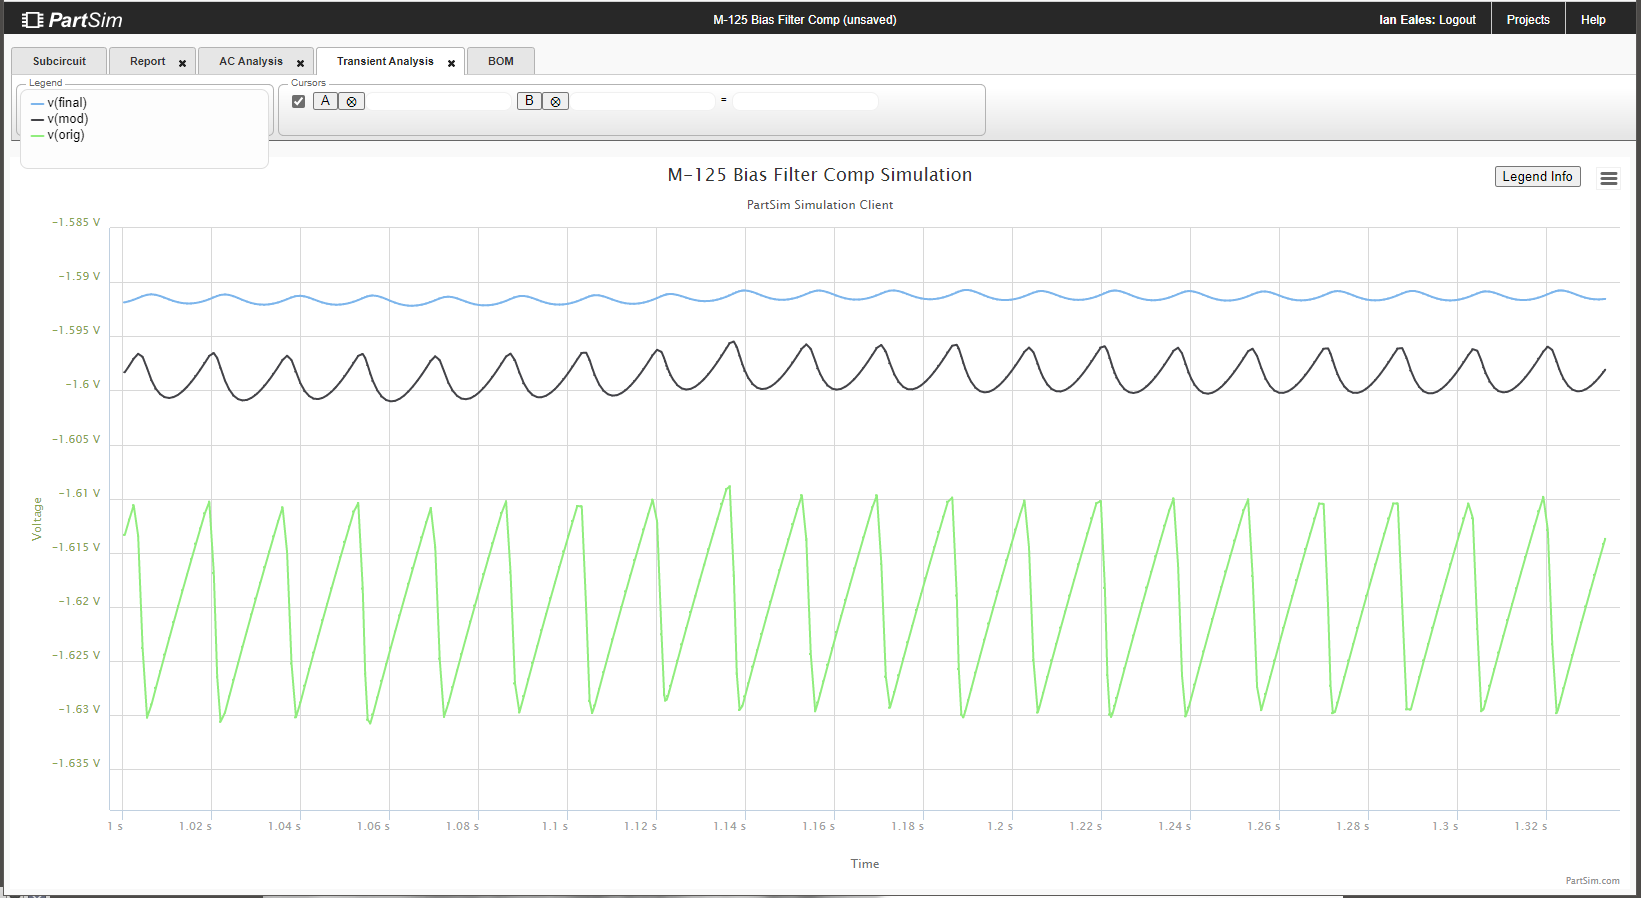
AB-Q current requirement is very low, ≈11mA. 3rd image compares
simulation Bias noise of factory, first 100Ω mod and the filter in the 4th
image. A 26db improvement over factory! -55VAC can supply at least 55mA.
regulated bias


My
Nan cautioned 'Idle hands are the Devil's playground.'
So, with my volunteer day jobs of SEAcoast Technical Director and DAV Volunteer Driver up
the CoViD-19 spout, I needed some occupational therapy. Hence, fully regulated
bias supply. Send me your address and I'll send you two 1N5622B DO-35 68V Zener
Diodes.
SNR is now >100db unweighted wrt full power.
ieLogical Revision
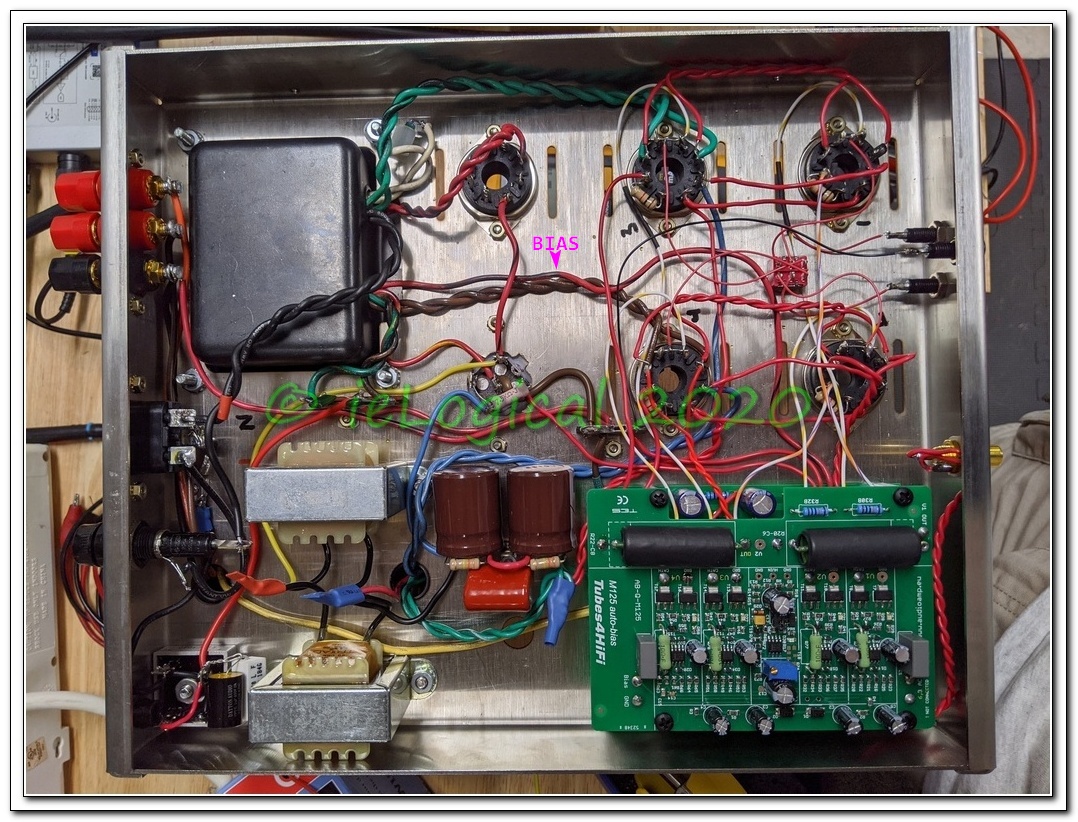
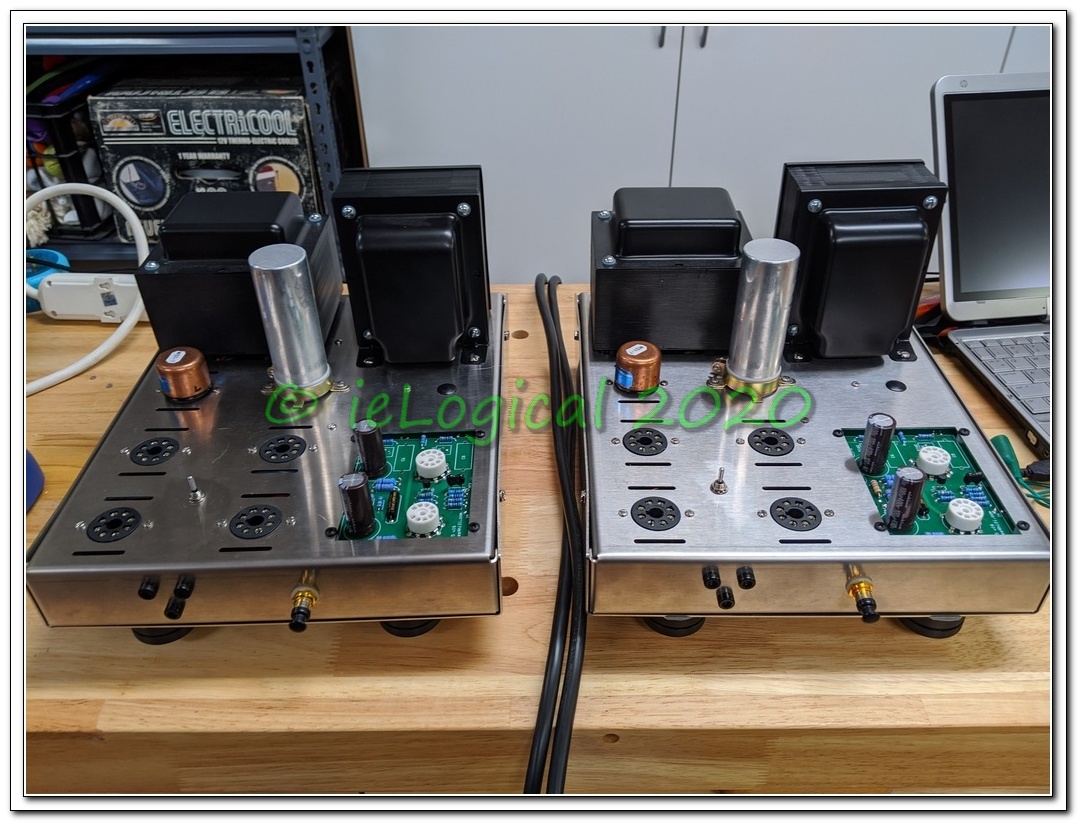
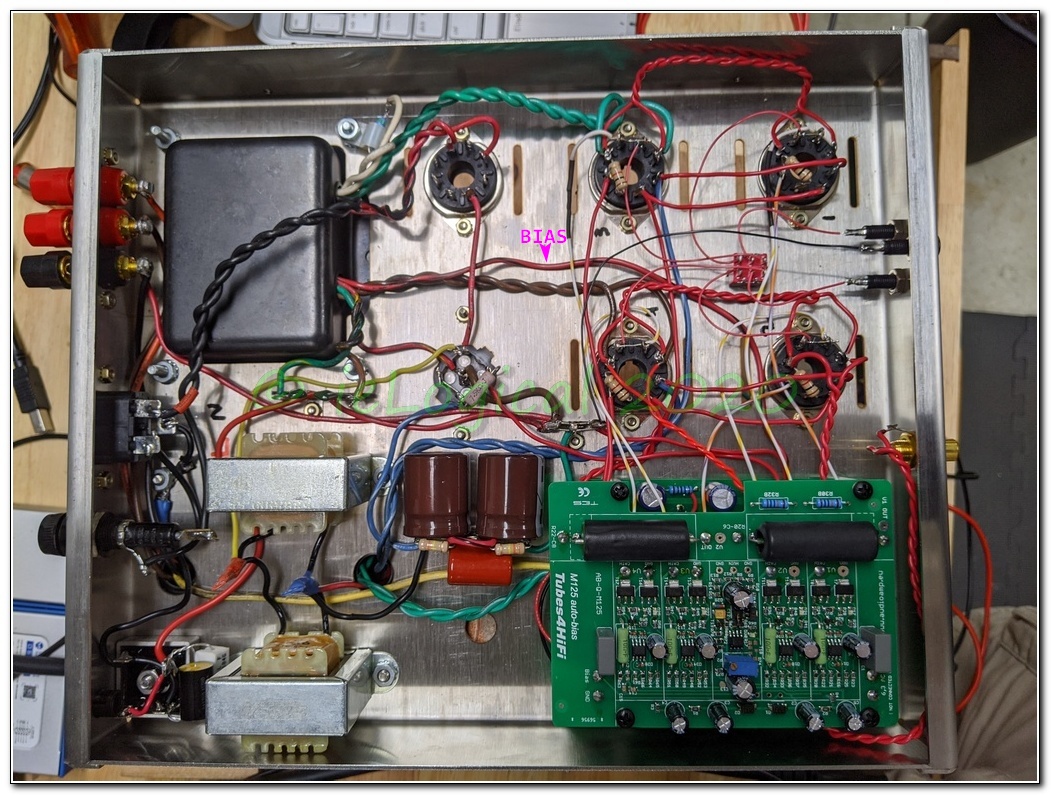
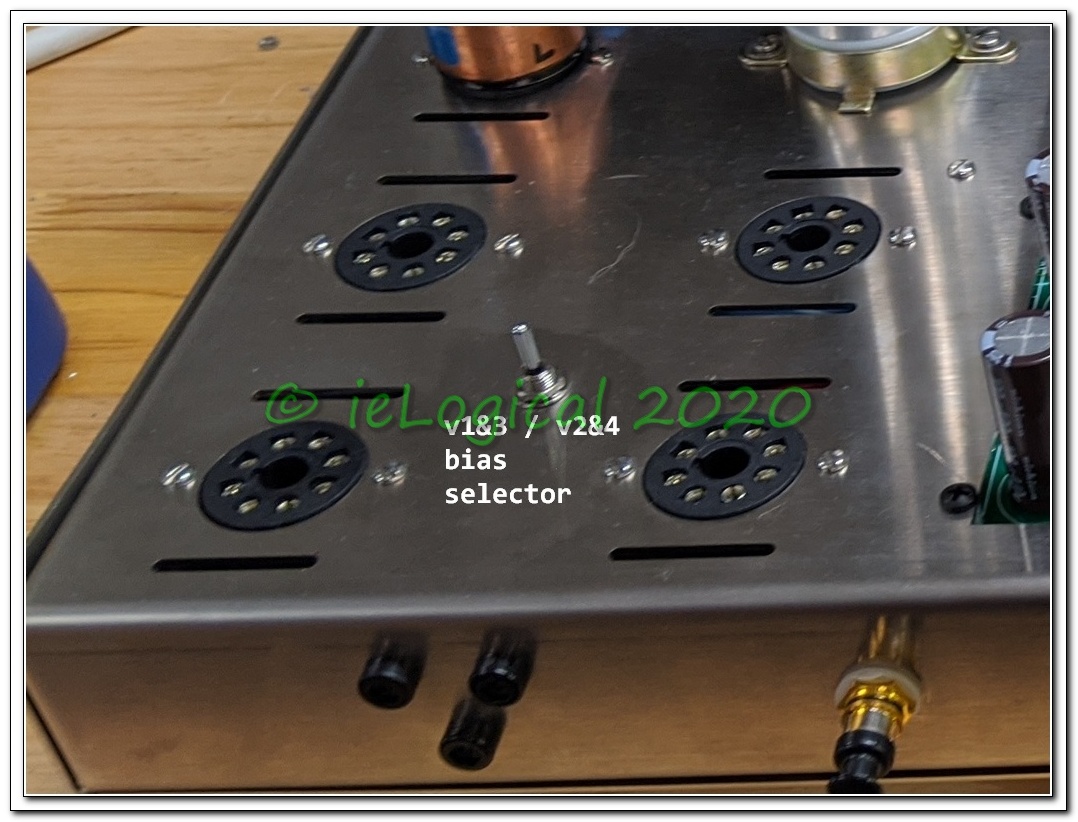
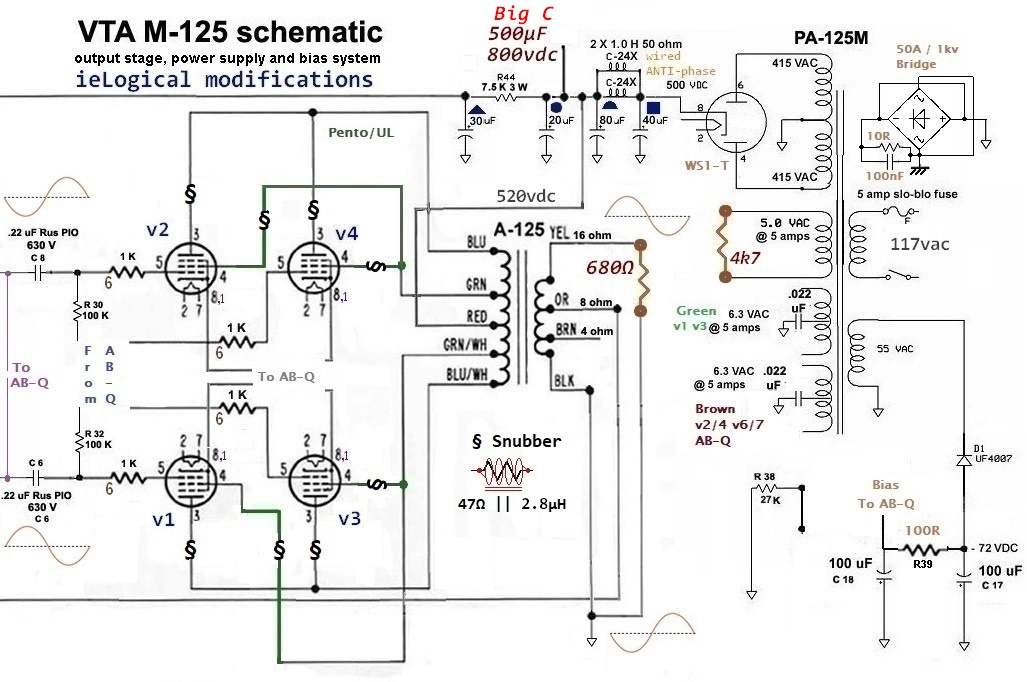
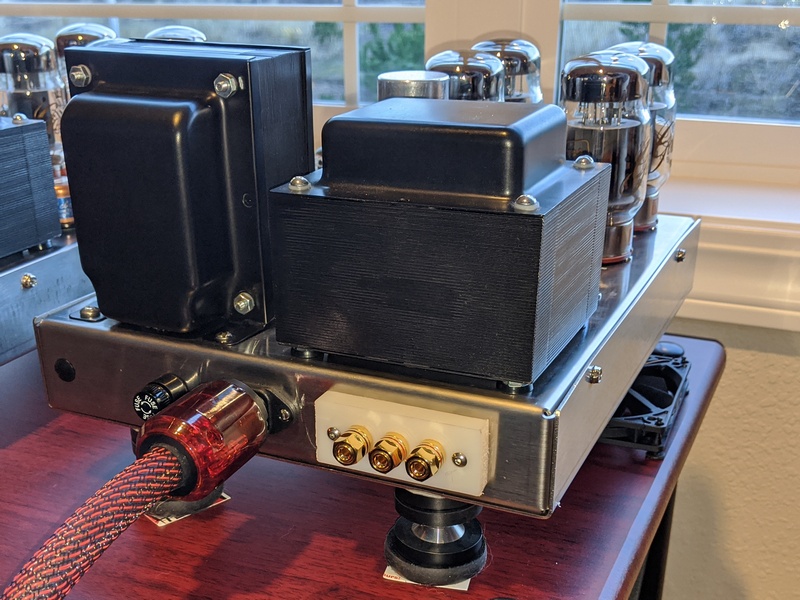

Since
the amps are now Pentode only, a DP ON-OFF-ON switch was added in place of the
Triode resistor terminal strip to allow v1/2 or v3/4 bias verification. Power
Schematic - w AuthentiCap symbols, SCM and ESL values and AB-Q connections - as
modified from original.
I got fed up with the Binding Posts and mount that would not hold. Replaced
with Vampire BP-HEX from Parts Connexion. Mount is milled
nylon, but could possibly be 3D printed. These amps remind me of a Fiat 131 mirafiori I
owned in the 70's. Once I got the crappy original parts off, it was
a great car!
'Audio Zealots'† will understand that the background is now inky black. Delicate
sounds shimmer, decay goes longer, impact is more stunning.
Very Nice Amps, Bob & Roy. Truly!
... Original page ended here ...
banned!

Jan
4, 2020: created a DTAF topic
'teaching the VTA M-125 to sing'
3 lines:
· my VTA built M-125 amps were noisy
· it is possible to make them almost 40db quieter
· a link to this page
4 images showing the noise as delivered and as quietened
Jan
5, 2020: Not wholly expected, banned from DTAF. Topics & posts deleted. I
guess Smilin' Big Bob wasn't amused.
* - One has to wonder about DTAF comment validity when accounts are banned for
anything critical and unrelated topics deleted. Subsequent to publication, many
Tubes4HiFi product owners have written confirming a lack of transparency and
support from Messrs. Latino and Mottram.
† - Mr. Latino referred to me as an Audio Zealot because I
didn't like a PoS Chinese Variac he recommended. In reply, I detailed numerous
faults by whom I consider competent, not fan-boy 'it lights up'
Amazon users. Posts deleted.
who ARE those guys?
Pre-purchase
Mr. Latino stated:
“The sonics of the amp will be the same with the AutoBias board.
You won't really hear any difference in sound quality with the AutoBias board
installed. I personally have never compared the two (manual bias and AutoBias)
MYSELF but others tell me that the sound is the same. The AutoBias board will
give you greater convenience.”
7-January-2020:
All AutoBias products and references scrubbed from Tubes4Hifi.
Mr. Latino states on diyAudio in VTA M-125
mono block kit. on diyAudio:

“Ian's amps have the 'autobias boards' that are sold by an independent distributor. Ian requested that they be added to his wired amp. The -95 dB signal to noise measurement for the M-125 was done 10 years before the autobias boards were ever created. When you remove the old bias pots and 'piggyback' a second board on top the driver board and start adding wires here and there to connect the autobias board, I am sure that the amp's residual noise level will increase somewhat.”
This
is utterly false. The product is branded Tubes4HiFi. I found the AB-Q boards on
Tubes4HiFi and its propaganda website DTAF. Tubes4HiFi / VTA
were building my amps. The original wiring is a rats nest of wires
here and there specified by someone who never gave routing a thought!
See DC Wiring above.
In response to a pre-purchase query about the AutoBias boards, Mr. Latino
stated:
“The cost for just me buying the two autobias boards for the two
M-125s are $180. To install them would be $100 for the two boards ($50 per each
amp) - Total > An extra $280 for the cost of the two boards + installation.
The cost is high. It takes time after installation of the board to adjust the
boards for the proper bias”
Yeah, right. All of 30 seconds per amp to adjust level in a shop with a 6.3vac
supply.
In response to to a query about R39 specific to AB-Q, Mr.
Latino stated:
“I can tell you that on the M-125s R39 can be either a 1K
resistor or a jumper wire. I use a 1K resistor but a jumper wire will work OK
also. What R39 does is that it sets the 'range' over which the bias may be
adjusted.”
Mr. Latino exhibits complete ignorance on something as simple as a voltage
divider and LPF relative to the AB-Q install. VTA's instructions are at fault
as proven by the 15db noise reduction when the AB-Q is properly installed.
See be careful,
your bias is showing above.
Why the complete turnabout from the 6 pages extolling AB-Q products on
DTAF AutoBias board on Roy's website?
I'm beginning to think Tubes4HiFi / VTA
may be good at copying 1950s designs when 117VAC did not have a Earth Safety
connection, but incapable of designs for US Standard Earth Safety Grounded
[since 1959] 120VAC [since 1967]. Their designs may work in some, but not, all
systems. They may be completely out of their depth in solving issues from bad
instructions and design. “Easy?
Help — Hard? Ignore”
Mr. Latino stated in the above referenced diyAudio thread:
“I am now not recommending the addition of the autobias boards to
any of the VTA amp kits or wired amps.”
Based on experience to date, a Tubes4HiFi / VTA
non-recommendation may be a ringing endorsement.
Adding Insult to Injury: DTAF users are not informed that an
account is banned. User messages to banned users cannot be replied on DTAF.
Users may think the banned user is giving them the shine.
Messrs. Latino & Mottram: Truth will out!
<Soto voce: Should these guys decide to go into politics,
their integrity is well on its way.>
See Erhard Audio AutoBias Modules for
all the reasons why AutoBias is preferred. These are my 9th tube amplifiers, 2
x M-125 counting as one. The last two are AutoBias and, perhaps due to my
advancing age, I'd not buy an amplifier without it!
The AutoBias boards have updates to make them more bulletproof to get around
some of the Tubes4HiFi flaws. At the bottom of the page are isolation
transformers to DC isolate older AB-Q from the heater supply.
ieLogical has no affiliation with Erhard Audio or AudioAmp.eu.
All information here is presented as a public service to victims of Tubes4HiFi / VTA
mistakes and/or non-support.
the project that wouldn't die

Things
started getting weird in February 2020. I was primarily working on Tri-Amping
the Eminent Technology LFT-8b,
never listening closely, but something was clearly not quite right. Channel
imbalance, strange distortion.
Finally getting the amps on the bench, I find the 20k & 30k resistors are
swapped on the driver board! A mere 30% over voltage and current on v7. Think
Big Bob will send me new tubes? No? Didn't think so either. The NFB lead on the
right amp is a dry joint and failed. Instead of Negative it became NO Feedback.
Right Amp: R14 also had a dry joint dropping v6 power. R22-C8 lead popped off
upon ABQ removal. Nothing to do but tear this garbage to bits and rework it all
like I should have done last year!
Upon inspection, I find the soldering similar to crap Chinese, thus every joint
was resoldered. Problems solved.
Without a doubt Mr. Bennihaha Woloss is the absolute worst technician klutz I've
come across in 50+ years in HiFi.
Ever since day one, the left amp would occasionally fail to play. Swapping
cables and tubes appeared to fix, but problem always
re-appeared. Hopefully the last factory defect, the left input jack had
an intermittent short!!!
RED plated! now I'm pissed
<rant>
Shitty engineering drives me batshit!
For a few pennies, the design could be 100% stable.
Tubes4HiFi / VTA
are either too cheap or incompetent.
In either case, they
should up their game!
</rant>
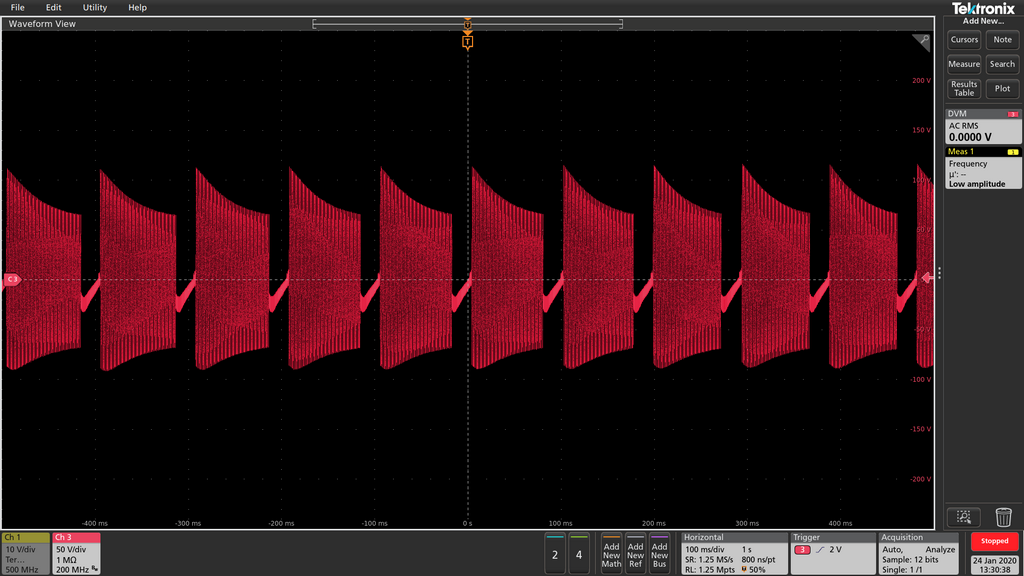
After
correcting the driver board, the bloody amps red plate and oscillate at
anything over ≈40W! Ken Galer had similar problems with his custom build.
See M-125 Build on
DTAF. The amps are works of art.
Since the M-125 is basically a rip of the Dynaco 120 / Mk
VI, I went back to the originals to see what Latino & co. had screwed up.
See Dynaco Transformers for the original 120 and Dynaco
Mark VI Manual.
Both the 120 & Mk VI have:
- • power tube plate & g2 snubber resistors
- • local feedback from the -phase U/L g2 tap nested inside the global feedback loop
- • a load across the output transformer 16Ω tap [680ohm;/120 - 620Ω/MkVI]. Mr. Latino admonishes never turn the amplifiers on without a load.

Snubbers
Every
tube electrode has an associated LCR property. Tubes willingly operate out to
10s of MHz. Parallel tubes can become oscillators when the electrode LCR along
with the circuit LCR interact just so across a short length of wire. Power
supply may also affect oscillation as seen in diy threads when PSU capacitance
is changed. The Tubes4HiFi / VTA
M-125 as designed is only marginally stable when built exactly as
instructed and parts that hew to the tolerance center. Change wiring, PSU
capacitance, layout or tubes and all bets are off. Modification Margin? None!
Dynaco amps with parallel output tubes inserted 47Ω at the electrode in
output transformer leads to isolate the electrode capacitance and prevent
oscillation. Adding snubbers makes the amps 100% stable. NOTE: My
amps are UltraLinear ONLY!! Snubber not examined for Triode
mode. USE CAUTION if implementing Triode mode. Triode mode w snubbers schematic.
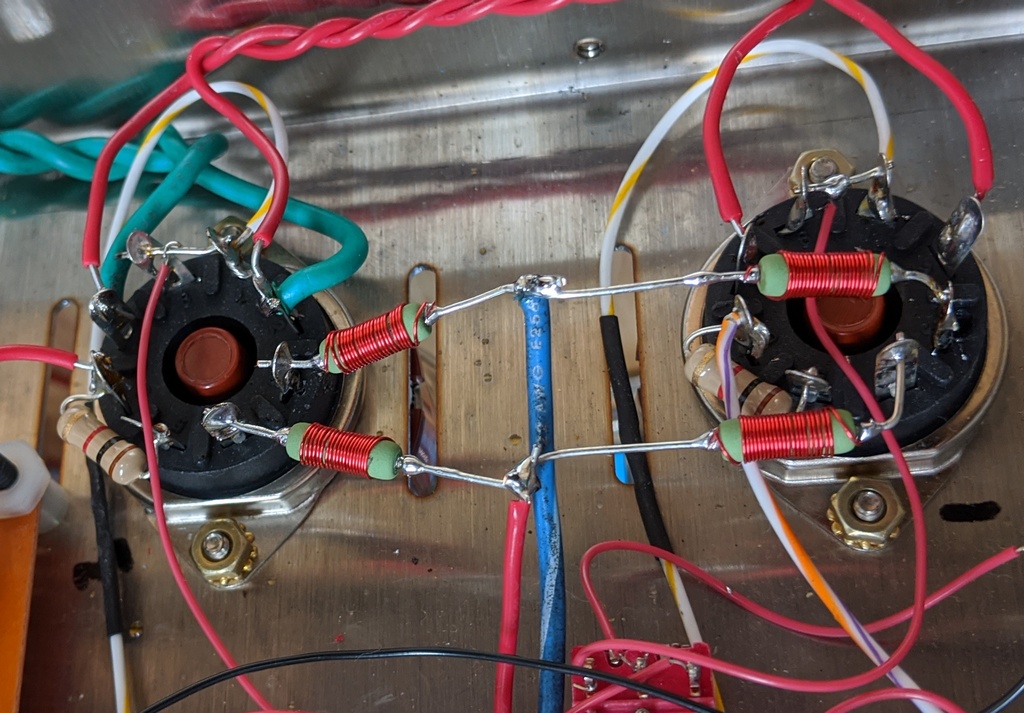
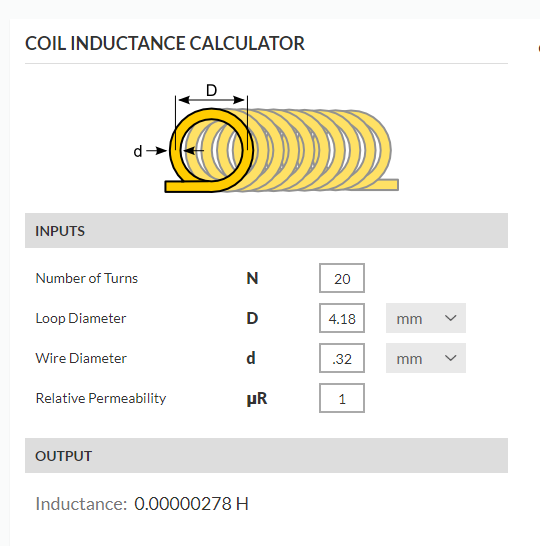
Adding 20-30 turns of 28ga magnet wire around a 2W 47Ω flameproof
700V Carbon Film resistor essentially removes the resistor at audio
frequencies. The 2 to 7µH creates an additional pole that is far outside the
open loop bandwidth. 28ga chassis wiring ampacity is 1.4A, far more plenty for
≈75mA/KT-88. Carbon Film has a negative temperature coefficient so the
resistance drops slightly with increased temperature, compensating slightly for
the increased OPT positive thermal coefficient. Send me your address and I'll
send you 12 feet of 28ga magnet wire.
LM334 Temperature Compensation


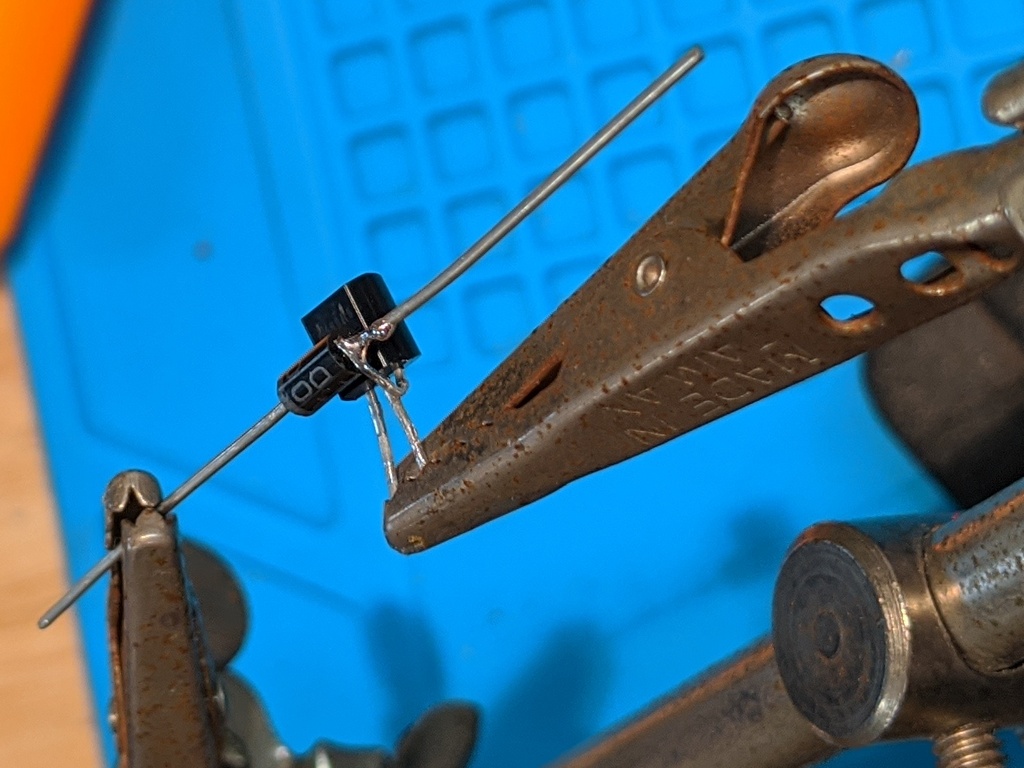
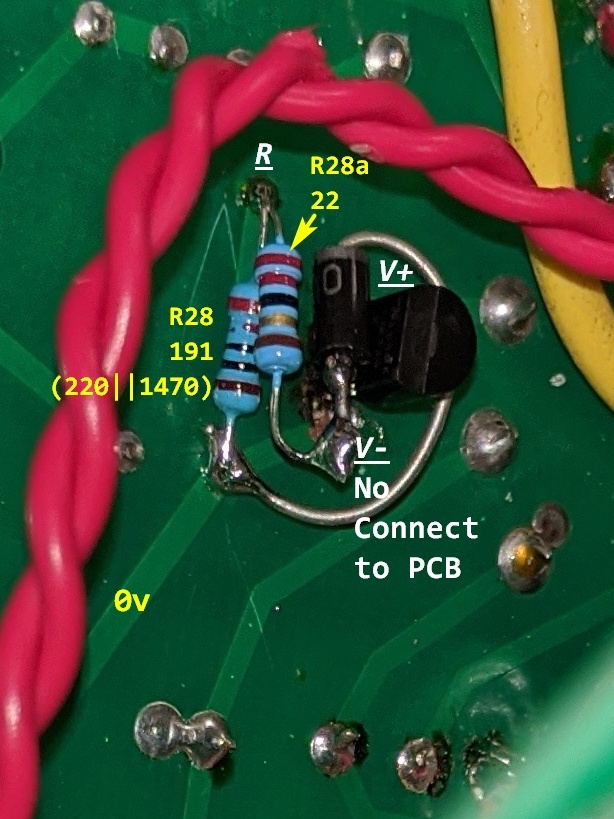
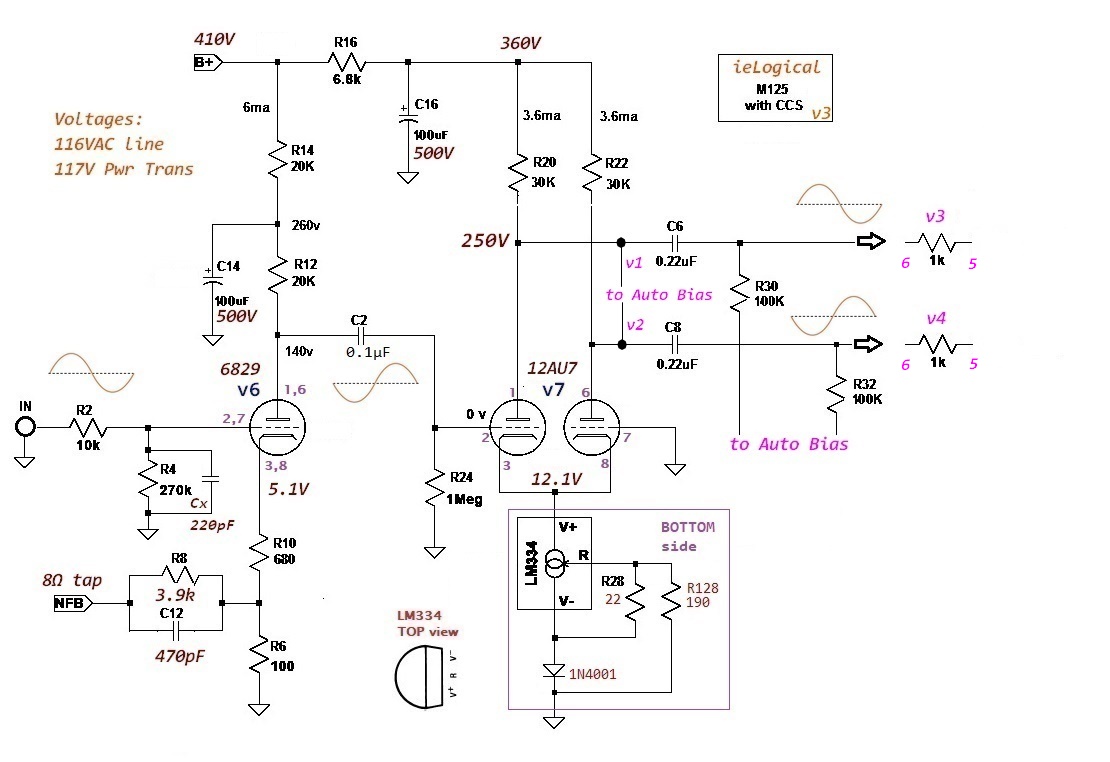

LM334
constant current sources [CCS] are temperature sensitive. Its sweet spot is
20µA to 1mA. The Tubes4Hi / VTA implementation is 10x ideal current which causes a LOT of
self heating. It is not temperature compensated and oscillates between
≈45°C and ≈55°C in a 16°C garage. R28 is plugged for close
enough @ ≈50°C, a stability the device never achieves. In
addition to the not inconsiderable 14°C self-heating, another 20°C is supplied
by the tubes after about 30 minutes. With amps side by side, Left amp
reaches design value sooner due to heat from Right amp power
tubes. In a cool room w airflow, Right amp may never reach design parameters.
Space amps adequately to ensure similar values. In a warm room with restricted
airflow, the LM334 may come perilously close to 70°C Tmax. ALL Tubes4HiFi / VTA
designs using the LM334 for the Phase Inverter tail suffer thusly: long warm up
time, temperature sensitivity and balance instability. This can be remedied
very easily.
Due to the LM334 instability, the Phase Inverter gain constantly changes, up to
½dB, and as a consequence, the image wanders. The amps never reach
equilibrium.
At a minimum, move the LM334 to the underside of the driver board. Note the
orientation of the LM334. On the bottom, the LM334 rounded side is toward the
transformers. Mounting under the board will prevent some heating by the tubes,
helping to stabilize the LM334. The current may not achieve design values
quickly as the internal chassis temperature rises slowly.
For the Temperature Compensated Full Monty:
The diode must be as close as possible to the LM334, ideally in contact for
maximum compensation effect. Thermal epoxy the two together for maximum
tracking [and minimum serviceability]. NOTE: LM334 'V-'
terminal DOES NOT CONNECT TO PCB!!!
Since my amps are built, I opted not to cut & strap the driver board. If
starting from a bare board, drill the PCB to more firmly mount the parts. ALL
CCS parts go on the PCB underside as shown. The 220Ω R28
in the image is trimmed to ≈190Ω with a 1k47 on the component side
to compensate for 22Ω rather than an ideal 20.5Ω / 240Ω
combination. None the less, the amps are now very stable. [These amps are
now officially proto-hacks.]
With compensation, the LM334 stabilizes rapidly and does not drift. Sonic image
now remains rock solid. Phase splitter balance is surprisingly good, tracking
perfectly from naught to clipping.
final thoughts
The deeper I looked into the M-125, the more I questioned many aspects of the M-125 amplifiers. [The entire Tubes4HiFi / VTA series???] From my and others' redplating experience, the amplifiers are only marginally stable. The ONLY redplating tube amplifiers I've ever seen are M-125s and my tube experience began in the 1950's with my Dad's Bogen!! The Tubes4HiFi / VTA amplifiers are ostensibly reworked Dynaco units, yet crucial stability components of the amplifiers were omitted. As mentioned, other that visual cachet, why use the AuthentiCap?


The
capacitor bank is too small. In today's world, Big C comes in little packages,
so it seemed wise to increase C and lower the power supply impedance by
over 80%! 6 x 330µF 500VDC caps fit nicely in the space
of the SCM and T/P mode switch. The bank is built in 3 stages. First make a 1 x
3 bank spacing the caps with 0.0625 thick temporary spacers.
Next, build the bank as 2 x 3, again with the spacers. Third, add 0.125
thick insulating standoffs to the bank bottom to allow
the caps to vent, should failure occur. Attach with a drop of Krazy Glue, being
careful to not run any down the side and glue in the temporary spacers. Spacing
is mandatory to allow thermal expansion and cooling. Insulate the chassis top
under the Big C bank in the event a capacitor should fail. The voltage on the
case of the upper capacitors in the bank are B+ ÷ 2. Insulate the
mounting bolt with heat shrink in the event a capacitor deforms.
It is imperative that balancing resistors are installed as in
the SCM.
Recommended practice is to use a pair of resistors per cap pair rather than a
single pair with capacitors commoned mid-bank.
We tested several capacitor brands. All capacitor brands tested within 1% after
forming. We reviewed a half dozen capacitor manufacturers' balance
recommendations, some of which needlessly waste power for close tolerance
parts.
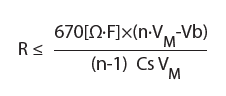
We used this formula from p11 in Aluminum Electrolytic Capacitor Application Guide from Cornell Dubilier and then quartered the calculated 1.6MΩ value to 470kΩ for additional safety margin. 470kΩ resistors dissipate ≈0.15W, so use 1W or larger for safety.
60Hz
dropped about 10db in the noise signature with Big C. Capacitor bank secured
with 2x bolts [1/4-20 or 6mm] with acorn nuts. A dab of removable Loctite
to ensure permanence.
The 1µF ESL polypropylene capacitor was removed as it did not enhance the
sound. IMO, impedance adjustment is more than hanging a film cap across
electrolytics. Performance wise, it made ZERO difference.

•
M-125s take feedback from the 16Ω tap w/o a 16Ω output. The closer
the source, the more accurate. Feedback moved to 8Ω tap. Distortion drops
about 33% across the audio spectrum.
• Moving feedback to 8Ω, reduces feedback by 0.707 so R8 is changed to
3.9kΩ. This increases feedback slightly to 4.4dB from 3.9dB, 6dB w v6/6829
& v7/12AU7.
• Changing R8 to 3.9kΩ raises the HF roll-off to 185kHz, probably a bit
high given the open loop transformer measurements. Changing to 470pF lowers to
85kHz, a bit less than 96kHz stock.
• 220pF C12 placed across R4 to add input 74kHz Low Pass.
• M-125 has no output transformer no load protection. Add
680Ω 5W resistor from 16Ω tap to 0vA for protection in the event of a
loudspeaker driver failure, connection loosening, etc. from potentially taking
out the OPT.
• A century after tubes became commonplace, controversy over the need to delay
B+ until electrodes are hot still remains. Thousands of tube articles
and opinions, but never proven. If anyone has proof, send me the link!
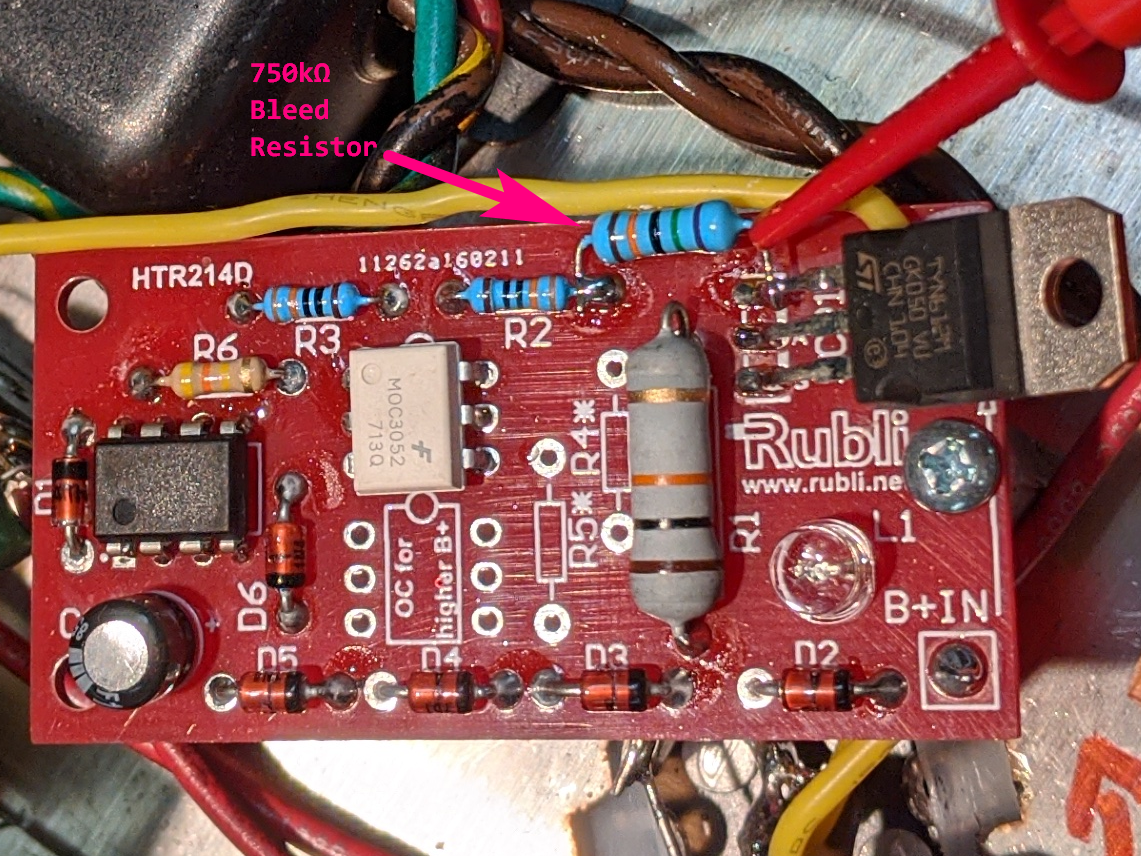
The Rubli HTR214 Soft Start insertion
point is after the AuthentiCap 40µF. The HTR214 has no bleed
resistor as the manufacturer expects those messing about inside a tube amp
to be safe. 24 hours after depowering, the SCR tab is still at 300VDC. Add
750kΩ as shown to bleed the cap in about 5 minutes.
Always keep one hand in your pocket until you've verified ALL CAPS
ARE DISCHARGED!!!
The life you save is your own.
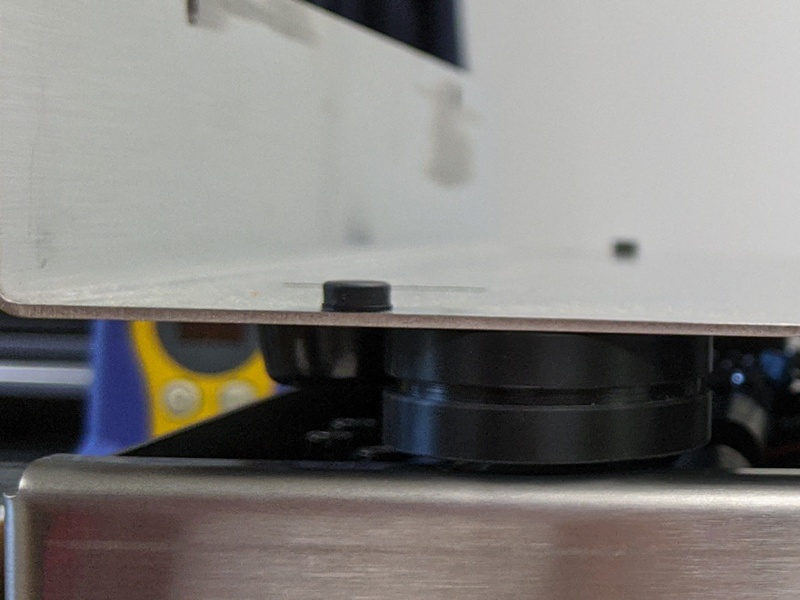
• Before buttoning up, add 6 each 0.25" x 0.125" high round rubber
bumper dots, front and rear, to provide a little more chassis ventilation and
damping. Centered and 3½ inches either side.
• Optionally add ≈0.062" spacers between top and bottom along the
sides to prevent the chassis caving in on the side. My covers provide the
necessary support.
See the Pudding @ lab on the cheap for the results of the above modifications.
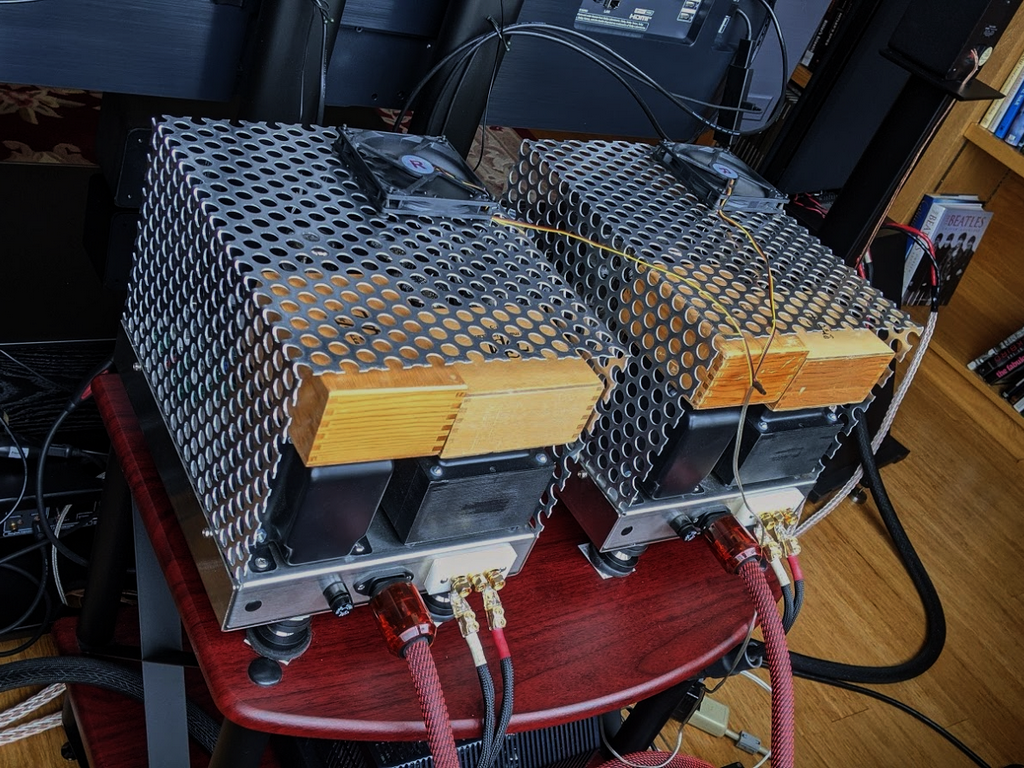

Tube voltages can be fatal. The M-125s have exposed parts with lethal voltages. Tubes are hot enough to cause severe burns. These covers are simple to fabricate. Metals Depot will cut perforated sheet to size. A metal shop can bend in a few minutes. PDF of CAD dwg 0.063 material fits between chassis & base and secures nicely. Depending on hole positions, a slight corner trim maybe required to clear chassis front and rear panel overlaps.
like WOW!!!
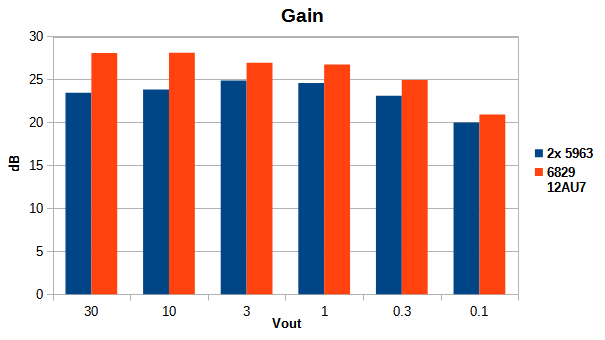
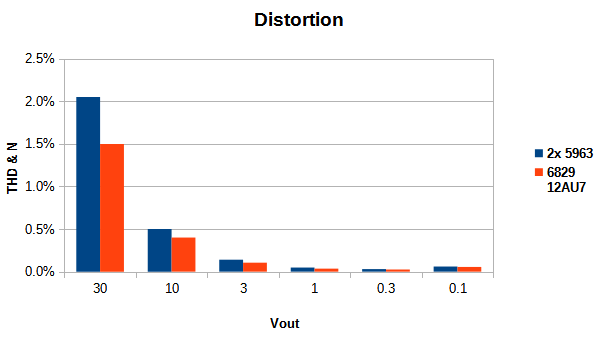
One
of the M-125 peculiarities is the same tube for both input and phase splitter.
It's not something often seen. The supplied 5963 low voltage gain of ≈20
contributes to lower than specified gain.
In a tri-amped system, it's a PITA. Something a bit higher gain like a 12AT7 or
one with a bit less gain might work. A tube mentioned as a lower gain 12AT7 is
the 6829.
Like the 5963 it's a computer tube. Tube parameters and Load
Line calculations for existing circuit component values exhibit ideal gain with
voltages and currents well within 6829 specifications.
Replacing
v6 with a 6829 and v7 with a 12AU7 [both NOS] increased and linearized the gain
and lowered distortion! Sonically, more open and
relaxed, especially when the program gets thick and robust. As always YMMV.
Familiar, decades old recordings reveal heretofore unexperienced detail and
transparency, exceeding all expectations. Post listening evaluation, bench
performance tests for gain and 1KHz distortion confirm the improved sonics.